Space Party Crafts: Stars, Planets and a Cardboard Rocket
Handmade space decorations from paper and cardboard: a freestanding rocket, a planet garland, a star and moon backdrop, rocket hats and star tags, all from simple shapes you draw yourself.

Tutorial at a glance
Materials
- Dark navy or plum poster board
- Cardstock in yellow, turquoise, white, pink and orange
- Corrugated cardboard from a shipping box
- Metallic paper scraps (optional)
- Thread or thin string
- Twine
- Picks or paper straws
Dark paper does most of the work in a space theme. Put yellow stars and a few bright planets on a navy or plum background and the room reads as outer space before a single complicated piece is made. These space party crafts use only plain shapes anyone can draw: stars, a crescent moon, striped and ringed planets, and a simple rocket.
Colors and paper for a space theme
Start with a deep background: navy or plum poster board, or a roll of dark paper. Against it, use yellow, turquoise and white for most pieces, plus one hot accent such as pink or orange for the rocket’s nose and a planet or two. Light colors on dark give strong contrast, which is why small stars still show from across the room.
Metallic paper works well in small amounts. A silver ring on a planet or a few gold stars catch the light; a whole wall of foil just reflects the room.
What you need
- Dark poster board or paper for the backdrop
- Cardstock, about 65 lb (176 gsm), in yellow, turquoise, white, pink and orange
- Corrugated cardboard from a shipping box, at least 24 in (60 cm) tall
- Small pieces of metallic paper (optional)
- Thread or thin string, twine
- Scissors, pencil, ruler, glue stick, tacky glue, double-sided tape
- Craft knife, metal ruler and cutting mat for the cardboard (adult use)
- Cups, lids and plates to trace
Freestanding cardboard rocket
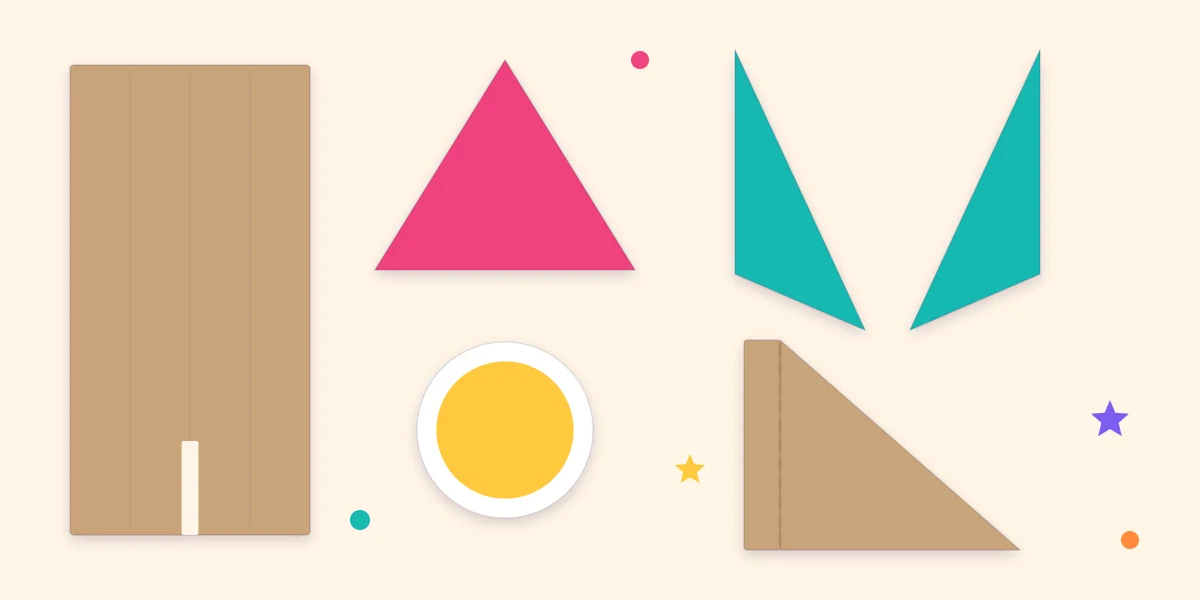
The rocket is a flat cutout that stands on a brace, about 2 ft (60 cm) tall. It has six parts: a body, a nose cone, two fins, a window and the brace.
- Draw the parts. On cardboard, rule a body rectangle about 8 x 18 in (20 x 46 cm). Draw a nose triangle with an 8 in (20 cm) base, about 7 in (18 cm) tall. Draw two fins as right triangles about 4 in (10 cm) wide and 7 in (18 cm) tall, and a brace as a right triangle about 6 in (15 cm) wide and 8 in (20 cm) tall.
- Cut the cardboard. An adult cuts the pieces with a craft knife against a metal ruler, using several light passes instead of one heavy one. The guide to the giant cardboard birthday number covers cutting corrugated board in more detail.
- Cut the slot. In the center of the body’s bottom edge, cut a slot as wide as the cardboard is thick and about 4 in (10 cm) long. Cut a slot of the same width in the brace, about 1 in (2.5 cm) in from its upright edge, running from the sloped edge down to 4 in (10 cm) above the base, so the two pieces slide together at right angles.
- Cover and assemble. Glue colored paper to the body, pink to the nose and turquoise to the fins. Join the nose to the top of the body and a fin to each lower side with strips of cardboard glued across the back.
- Add the window. Trace a cup onto yellow cardstock, cut the circle and glue it to the upper body.
- Stand it up. Slide the brace into the slot. If the rocket leans, the slots are too shallow; deepen both a little at a time.
A slotted brace pulls out again, so the rocket stores flat. If the cardboard is too thin to hold a slot, glue the brace’s long edge to the back as a fixed easel instead.
Safety note
Cutting corrugated cardboard with a craft knife is an adult job. Children can take over at the covering and decorating stage.
Paper planets and a planet garland
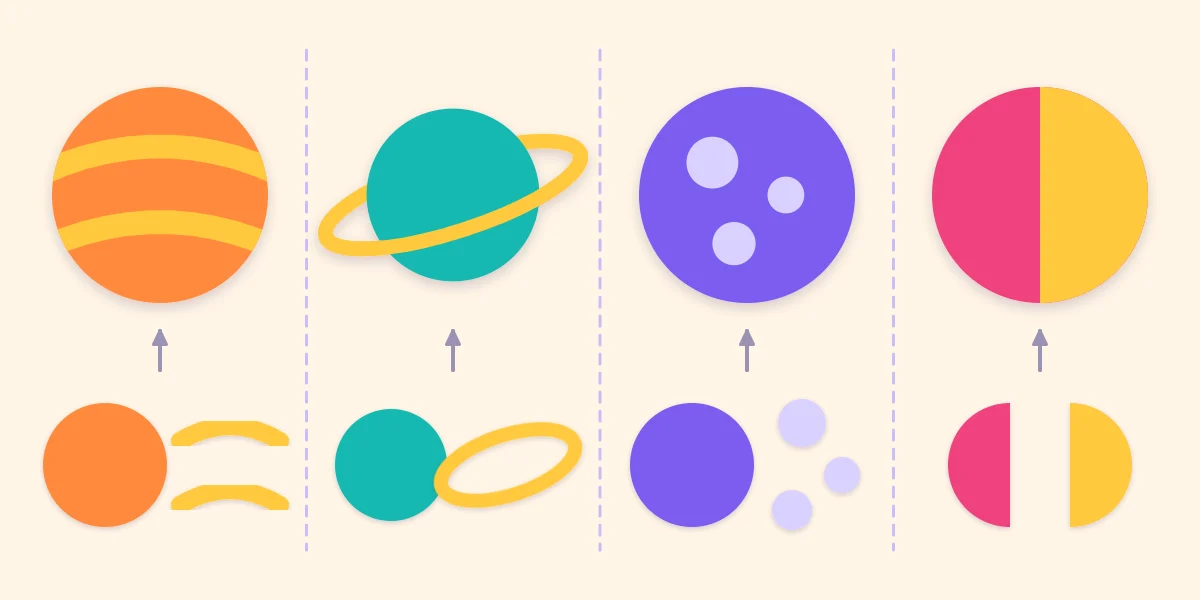
Every planet starts as a circle traced from a lid, about 4 in (10 cm) across. Four simple treatments give a varied set:
- Striped. Glue two curved strips of a second color across the circle and trim the ends flush with the edge.
- Ringed. Cut a long, narrow oval ring about 6 in (15 cm) wide. Cut one slit through the ring, slip it around the planet at a tilt, and glue it so the back half of the ring sits behind the circle.
- Cratered. Glue on three dots in a darker shade, in three different sizes.
- Two-color. Cut circles in two colors, cut one in half and glue a half over the whole circle.
For a garland, make five planets with a plain circle of the same size for each back. Sandwich a length of thread between front and back with a glue stick, leaving about 6 in (15 cm) between planets. This is the glued method from the paper circle garland, used with larger circles.
The same planets at about 2 in (5 cm) across, glued to a pick with a plain back circle, become cupcake toppers. They come off before eating.
Star and moon backdrop
Tape two or three sheets of dark poster board together on the back to make a panel behind the table. For a crescent moon, trace a plate onto yellow cardstock, then shift the plate sideways by a third of its width and trace again; cut along the two curves.
To draw a five-point star without a pattern, mark five evenly spaced dots around a traced circle, join every second dot with a ruler, and cut around the outline. Cut stars in three sizes, from about 1 to 4 in (2.5 to 10 cm), and cluster them unevenly, with more near the top. Even spacing looks like wallpaper; clusters and gaps look like sky.
The backdrop doubles as a photo corner. A star wand and a planet on a straw can be added to a set of photo booth props.
Rocket hats and star tags
A standard cone hat becomes a rocket with three additions, all made while the pattern is flat: a yellow circle window, a contrasting band along the base, and two small triangular fins glued to the inside of the rim once the cone is closed. The pattern and rolling method are in the paper party hat tutorial.
For favor tags, cut stars about 3 in (7.5 cm) across from yellow cardstock, punch a hole in one point and tie on twine. Glue a small white circle in the center as a place to write a name.
Space pieces by effort
| Piece | Effort | Rough time |
|---|---|---|
| Star tags | Very easy | About 20 minutes for a dozen |
| Star and moon backdrop | Easy | About 45 minutes |
| Planet toppers | Easy | About 45 minutes for a dozen |
| Planet garland | Easy | About an hour |
| Rocket hats | Moderate | About 15 minutes each |
| Cardboard rocket | Moderate | About an evening |
Frequently asked questions
How do you make a cardboard rocket stand up?
Cut a slot in the bottom edge of the rocket body and a matching slot in a triangular cardboard brace, then slide the two together at right angles. If the cardboard is too thin to hold a slot, glue the brace's long edge to the back as a fixed easel.
What colors work for a space party?
A deep navy or plum background with yellow, turquoise and white pieces, plus one hot accent such as pink or orange. Light shapes on dark paper give strong contrast, so even small stars show from a distance.
How do you make a paper planet with a ring?
Cut a circle for the planet and a long, narrow oval ring wider than the circle. Cut one slit through the ring, slip it around the planet at a tilt and glue it so the back half of the ring sits behind the circle.