DIY Photo Booth Props From Cardstock and Paper Straws
Draw eight simple props on folded paper, cut them from stiff cardstock and fix them to paper straws with tape and glue so the handles stay on.
Tutorial at a glance
Materials
- Heavy cardstock in four or five colors, about 80-110 lb (216-300 gsm)
- Scrap printer paper for templates
- Thin cardboard from a cereal box
- 8 paper straws or flat wooden craft sticks
- Clear tape
- Liquid craft glue or tacky glue
- Glue stick
A set of DIY photo booth props is mostly a drawing exercise: eight simple shapes, cut from stiff cardstock and fixed to paper straws. None of them needs a pattern. Folding a sheet of scrap paper in half and drawing half of each shape against the fold gives a symmetrical outline every time, and that outline becomes a template you can trace as often as you like.
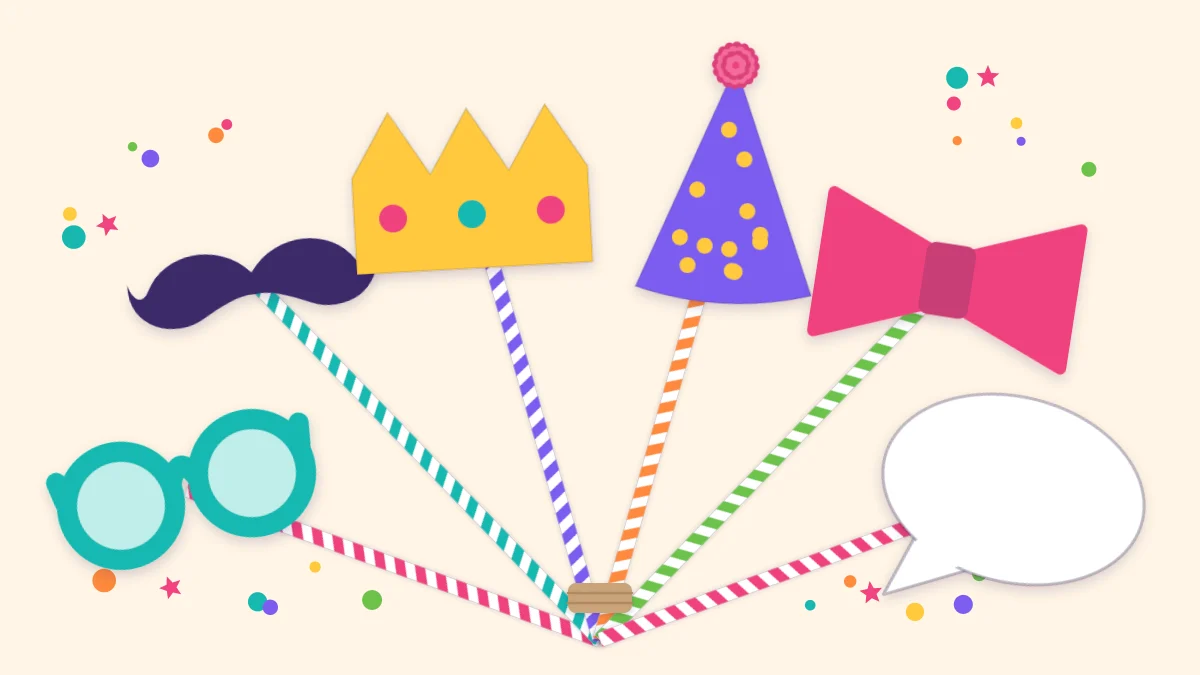
The set below covers oversized glasses, a mustache, a bow tie, a crown, a party hat, a speech bubble, a star wand and a pair of lips. All are plain, generic shapes in party colors. Skip logos and anything copied from a film, show or game; simple shapes read better in photos anyway.
What you need
- Heavy cardstock, about 80-110 lb (216-300 gsm), in four or five colors including white
- Scrap printer paper for drawing templates
- Thin cardboard from a cereal box, for backing any prop that flops
- Paper straws or flat wooden craft sticks, one per prop
- Clear tape and liquid craft glue or tacky glue
- Glue stick for paper layers
- Pencil, ruler, scissors and a round lid or glass to trace
Pointed skewers are not a good handle choice at a party with children, since props get waved near faces. Paper straws and flat craft sticks have blunt ends and give tape more surface to grip.
How big to make each prop
Props that match real-life sizes look small in photos. Make them larger than seems sensible; glasses wider than the face are part of the joke, and a big shape hides less of the expression behind it than a fussy detailed one.
| Prop | Suggested size | Handle position |
|---|---|---|
| Glasses | About 7 in (18 cm) wide | One side, behind a lens rim |
| Mustache | About 6 in (15 cm) wide | One end |
| Bow tie | About 6 in (15 cm) wide | Center, pointing down |
| Lips | About 5 in (12.7 cm) wide | One end |
| Crown or party hat | About 7 in (18 cm) wide | Center, pointing down |
| Speech bubble | About 9 x 6 in (23 x 15 cm) | Bottom, off center |
| Star wand | About 5 in (12.7 cm) across | Center, pointing down |
Side handles keep the hand out of the picture for props held in front of the face.
Draw symmetrical shapes on a fold
- Fold the scrap paper in half and crease it. The fold is the center line of the prop.
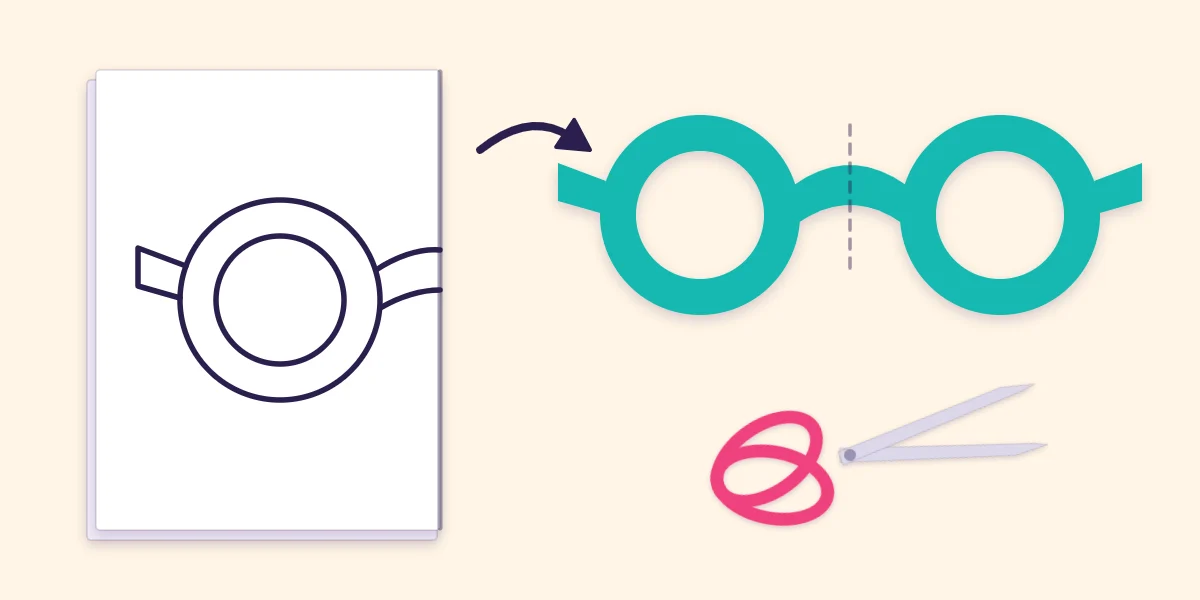
- Draw half the shape against the fold. For glasses, draw one round lens by tracing a lid about 3 in (7.5 cm) across, add a smaller circle inside it, then draw half the nose bridge running into the fold. The bridge must touch the fold or the two halves will fall apart when cut.
- Cut through both layers along the outline, then cut out the inner lens. Pinch the lens circle to start a snip in its middle rather than cutting in from the rim.
- Unfold. If the shape looks too thin or too small, refold, redraw and cut again. Scrap paper is cheap; cardstock is not.
- Trace the unfolded template onto the back of the cardstock and cut it out. Move the paper into the scissors on curves instead of twisting your wrist.
The same fold works for the mustache (half a curled teardrop), the bow tie (a triangle meeting half a small knot), the lips, the crown and the star. The party hat is a tall triangle with a circle on top. The speech bubble is the one shape drawn flat: trace a plate for an oval and add a small pointed tail at the lower edge. Leave it blank, or write one short word of your own in thick marker.
Cut, back and decorate
Hold each cut prop by one end. If it droops, it needs backing: glue it to thin cardboard with a glue stick, press it under a book for a few minutes, then trim the cardboard flush with the cardstock. Glasses and the speech bubble almost always need this.
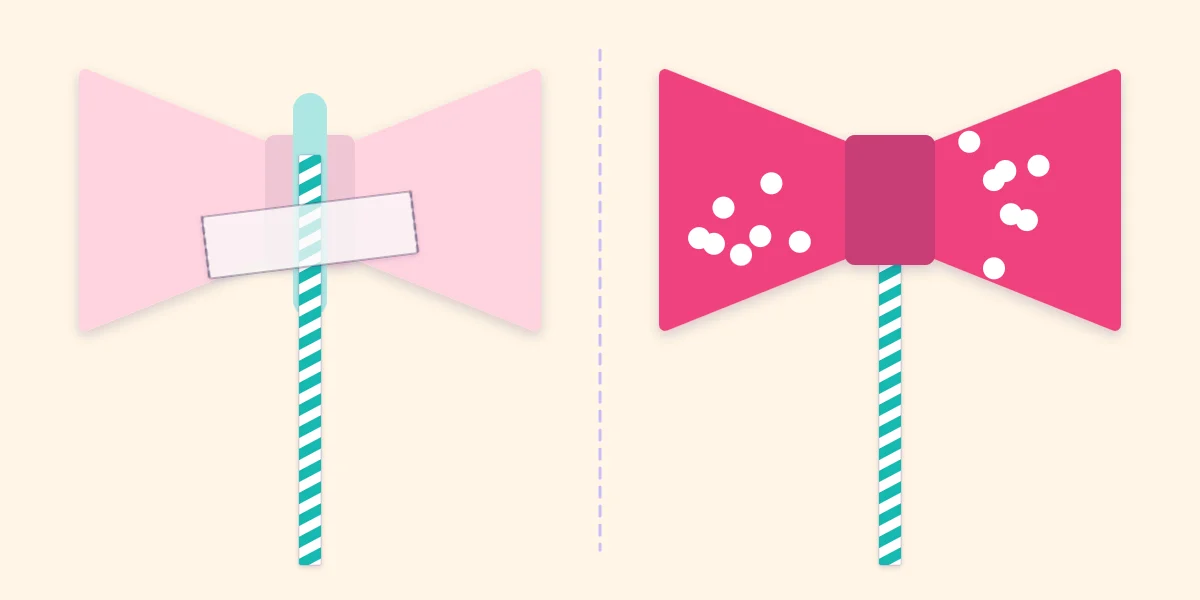
Add details in layers of paper rather than drawn lines, which fade in photos. A white highlight curve on each lens, a knot in a second color on the bow tie, paper dots on the party hat and round gems on the crown points are enough. Keep to the colors used elsewhere in the room so the props look like part of a set with the welcome and table signs.
Safety note
Cutting the inner lens holes with a craft knife on a cutting mat is neater than scissors, but it is an adult job. Supervise children with scissors on the thick cardstock.
Attach the handles
- Turn the prop face down and lay the straw so its top 2 in (5 cm) overlap the back of the prop.
- Run a line of liquid glue under that overlap and press the straw into it.
- Tape across the straw with a strip of clear tape, pressing it down on both sides so it grips the cardstock.
- Leave it flat to dry for about half an hour before anyone picks it up.
Tape and glue do different jobs. Tape holds the straw in place immediately; glue is what keeps it there after the prop has been waved around for an hour. Flattening the top of the straw between your fingers first gives both a wider surface to hold.
A simple backdrop to go with the props
Props need a plain, colorful background and a spot with good light. A wall facing a window works better than one beside it. The quickest backdrop is a curtain of crepe paper streamer strips hung from a string; the paper streamer ideas guide shows how to build one. For something more structured, a cluster of paper rosettes in three sizes fills the space behind two or three people.
Stand the props upright in a jar weighted with dry rice or pebbles so guests can see the choices. Fix any backdrop with a removable method tested on a hidden spot first.
Keeping props flat for next time
Cardstock props warp if they are left leaning in a jar for weeks. After the party, lay them flat in a large folder or between two sheets of cardboard, handles all pointing the same way, and store them somewhere dry. A loose handle is a quick repair with fresh glue and a new strip of tape.
Frequently asked questions
What paper is best for photo booth props?
Heavy cardstock, about 80-110 lb (216-300 gsm), holds its shape on a stick. Lighter cardstock works if you glue it to thin cardboard from a cereal box and trim the edges flush. Plain printer paper is too floppy for anything but the templates.
How do you keep the sticks from falling off?
Use both glue and tape. A line of liquid glue under the top of the straw gives the lasting hold, and a strip of clear tape across the straw keeps it still while the glue dries. Let the props dry flat for about half an hour before use.
How many props do you need for a party?
A set of eight gives enough choice for a group photo of three or four people with some left to swap. For a larger party, make duplicates of the most popular shapes, usually the glasses and the mustache, rather than inventing more designs.