How to Make a Giant Cardboard Birthday Number
Draw a block numeral on a grid, cut it from a shipping box and cover it with paper squares, tissue fringe or paint and confetti dots. Includes an easel-back stand.

Tutorial at a glance
Materials
- Corrugated cardboard panel, at least 16 x 24 in (40 x 60 cm) per digit
- Extra cardboard for the stand
- Liquid craft glue or tacky glue
- Glue stick
- Cardstock or paper scraps, tissue paper, or craft paint and paper confetti
- String and a removable hook, if hanging
A shipping box, a pencil grid and an evening are enough to make a giant cardboard birthday number that stands about 2 ft (60 cm) tall. The numeral is a plain block shape that you draw yourself, so no stencil is involved, and the covering is where the color comes from.
The steps below draw the number, cut it out, cover it in one of three ways and then stand it up or hang it. Cutting corrugated cardboard is the only part that calls for an adult; everything after that is gluing paper.
What you need
- A flat panel of corrugated cardboard at least 16 x 24 in (40 x 60 cm) per digit, such as one side of a large shipping box
- A second piece of cardboard for the stand
- Pencil, long ruler or yardstick, and a plate for rounding corners
- Craft knife and cutting mat, or heavy scissors for thin single-wall board
- Liquid craft glue or tacky glue, and a glue stick
- One covering: cardstock or paper scraps, tissue paper, or craft paint and paper confetti
Pick a panel without deep creases. A fold line running across a stroke of the number becomes a hinge, and the number will bend there every time it is moved.
Draw the number on a grid
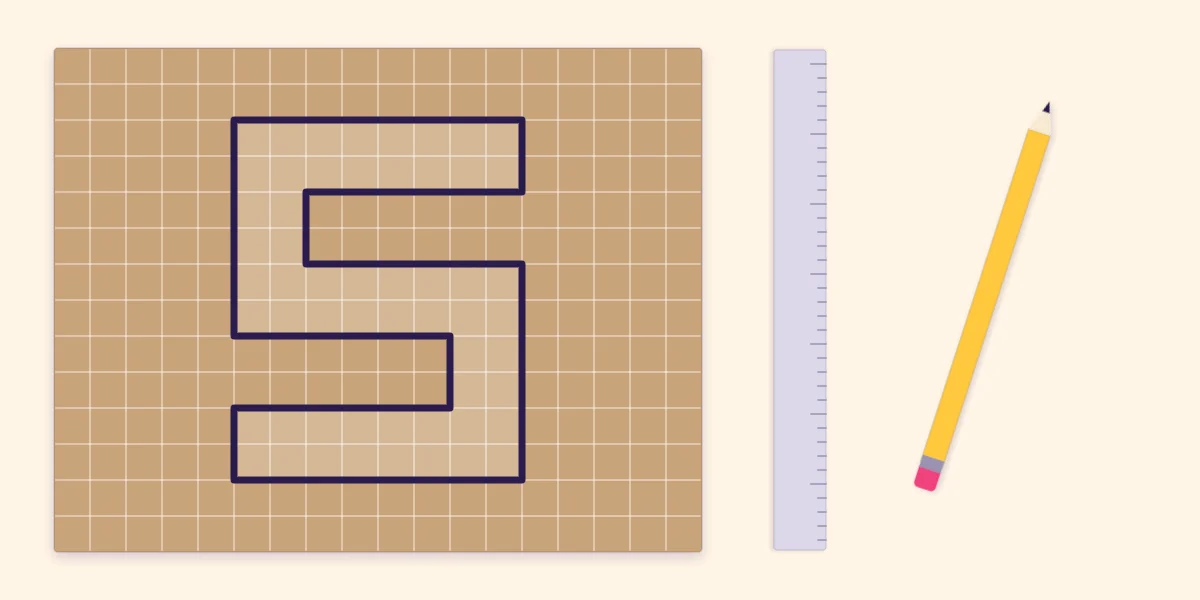
A grid keeps the numeral in proportion and, more importantly, keeps every stroke the same thickness. Uneven strokes are what make a hand-drawn number look wobbly.
- Rule a rectangle 16 in wide x 24 in tall (40 x 60 cm) on the cardboard.
- Divide it into 4 in (10 cm) squares: four across and six down.
- Draw the numeral so each stroke is exactly one square thick. A five, for example, is a bar across the top row, a short upright on the left below it, a bar across the middle, an upright on the right and a bar along the bottom row.
- Soften the outer corners of curved digits by tracing part of a plate, keeping the stroke one square wide all the way around the curve.
- Go over the final outline firmly and shade the parts to be cut away, so the wrong piece does not get removed.
Digits such as 0, 4, 6, 8 and 9 have enclosed openings. Draw each opening at least one full square wide, because a narrow one is hard to cut cleanly. For a two-digit age, draw both numerals at the same height on separate panels.
Cut the cardboard
Corrugated board cuts best with several light passes of a craft knife rather than one hard one. Lay the panel on a cutting mat or a spare sheet of thick cardboard, hold a metal ruler along the line, and draw the blade along it three or four times, cutting a little deeper each time. A fresh blade matters: a dull one drags and tears the paper face.
Thin single-wall board can be cut with heavy scissors instead, though the edge will be slightly crushed. Rough edges disappear under the covering. The guide on how to cut, score and fold paper covers knife and ruler technique in more detail.
Safety note
Cutting the cardboard is a job for an adult. Keep the holding hand behind the blade, cut away from the body and put the knife away before children join in for the decorating.
Three ways to cover the number
Each covering gives a different look, and all three hide the printed or taped surface of a used box.
Paper squares
Cut cardstock or paper scraps into squares about 2 in (5 cm) across. Glue them on with a glue stick in a loose patchwork, overlapping the edges so no cardboard shows, then trim anything that hangs past the outline. This is the quickest option.
Tissue fringe rows
Cut tissue paper into strips about 3 in (7.5 cm) tall, then snip fringe 1/2 in (12 mm) wide along one edge, stopping about 1 in (2.5 cm) from the other. Run a line of liquid glue across the bottom of the number and press the uncut edge of a strip onto it. Work from the bottom up, placing each new row so its fringe covers the glued band of the row below. Starting at the top is the usual mistake; it leaves every glue line exposed. Changing color every few rows, from yellow at the bottom through orange to pink at the top, gives a shaded effect. The fringe is cut the same way as for a tissue paper tassel garland.
Paint and confetti dots
Brush on one or two coats of craft paint and let it dry flat so the board does not warp. Then glue on paper dots in contrasting colors, scattered unevenly. Punched circles work, and so does a handful of handmade paper confetti.
| Covering | Time | Mess | Look |
|---|---|---|---|
| Paper squares | About half an hour | Low | Flat, bright patchwork |
| Tissue fringe | An hour or more | Medium, tissue scraps | Soft, shaggy and full |
| Paint and confetti | Short, plus drying time | Highest | Smooth with scattered dots |

Make it stand or hang it
A flat number leans against a wall with no extra work, but an easel-back brace lets it stand anywhere.
- Cut a right-angled triangle from cardboard, about 14 in (35 cm) tall and 8 in (20 cm) along the base, with a 1 in (2.5 cm) strip added along the tall edge.
- Score the line between the strip and the triangle and fold the strip to one side to make a gluing flap.
- Glue the flap to the back of the number so the base of the triangle sits level with the bottom edge. Tacky glue under a heavy book, or hot glue applied by an adult, both hold well.
Fix the brace behind a solid upright part of the numeral. A wide digit may need two. To hang the number instead, tape and glue a loop of string to the back near the top and use a removable hook, testing it on a hidden spot first.
Tip
Cover the number before attaching the brace. It lies flat on the table while you work, and the fringe rows stay straight.
Where to put it
The number is large enough to be a focal piece on its own: beside the cake table, at the entrance or under a banner. Keep it clear of candles and heaters. Paper-square and painted versions store flat for another year; tissue fringe crushes, so treat that one as a one-party piece.
Frequently asked questions
How do you draw a big number on cardboard without a stencil?
Rule a rectangle 16 x 24 in (40 x 60 cm) and divide it into 4 in (10 cm) squares. Draw the numeral in a plain block style so every stroke is one square thick, then round the outer corners by tracing part of a plate.
What is the best way to cut corrugated cardboard?
An adult should use a craft knife against a metal ruler on a cutting mat, making three or four light passes instead of one hard cut. A fresh blade gives a cleaner edge. Thin single-wall board can be cut with heavy scissors.
How do you make a cardboard number stand up?
Glue a triangular cardboard brace to the back, with a folded flap along its tall edge and its base level with the bottom of the number. Place it behind a solid upright part of the numeral, and use two braces for a wide digit.