How to Make Paper Rosettes for a Birthday Backdrop
Fold paper strips into full-circle rosettes that stay flat: how to size the strips, fold even pleats, secure the center and shape the edge.

Tutorial at a glance
Materials
- Cardstock, about 65 lb (176 gsm), or lighter decorative paper
- Double-sided tape or glue stick for joining strips
- Hot glue, or tacky glue and a heavy book
- Two paper circles per rosette for the center
Paper rosettes are accordion-folded strips pulled around into a full circle and pinned flat at the center. A cluster of five or six in mixed sizes fills a wall behind the cake table faster than almost any other handmade decoration, and each one uses only a sheet or two of paper.
The folding is simple. What trips people up is the size (strips that are too short will not close into a circle) and the center, which springs open unless it is secured properly. Both have straightforward fixes.
What you need
- Cardstock of about 65 lb (176 gsm), or lighter paper such as wrapping paper or text-weight paper
- A ruler, a pencil and scissors
- A bone folder or an empty ballpoint pen for scoring
- Double-sided tape or a glue stick for joining strips
- Hot glue, or tacky glue plus a heavy book, for the center
- Two paper circles per rosette, about one third of the finished diameter
How rosette size works
Two rules decide everything. First, the width of the strip becomes the radius of the rosette, so a strip 3 in (7.5 cm) wide makes a rosette about 6 in (15 cm) across. Second, the total strip length needs to be about three to four times the finished diameter. Less than that and the folds are stretched nearly flat; more and the rosette becomes dense and hard to press down.
A letter sheet is 11 in (27.9 cm) long, so anything bigger than a small rosette needs two or three strips joined end to end.
| Strip width | Strips of 11 in (27.9 cm) | Fold width | Finished diameter |
|---|---|---|---|
| 1.5 in (4 cm) | 1 | 1/2 in (12 mm) | About 3 in (7.5 cm) |
| 3 in (7.5 cm) | 2 | 1/2 in (12 mm) | About 6 in (15 cm) |
| 4.25 in (10.8 cm) | 3 | 1 in (2.5 cm) | About 8.5 in (21.6 cm) |
| 5.5 in (14 cm) | 3 or 4 | 1 in (2.5 cm) | About 11 in (28 cm) |
Narrow folds of about 1/2 in (12 mm) suit small rosettes; folds of 1 in (2.5 cm) look better on large ones and take half as long to make.
Fold even accordion pleats
Uneven pleats are the main reason a rosette looks lopsided, so this is the step to take slowly.
Cardstock: score first. Mark the fold width along both long edges of the strip, line the ruler up between each pair of marks and draw the bone folder along it. Then fold back and forth along the scores. Scored cardstock folds exactly on the line and does not crack; the guide on how to cut, score and fold paper explains the technique in detail.
Lighter paper: fold in halves. Fold the strip in half end to end, then in half again, and again, until the sections are the width you want. Unfold, then re-crease every other fold in the opposite direction so the strip zigzags. No measuring is needed, and the folds come out equal because each one halves the last.
Each strip should begin and end with folds that point the same way, so that neighboring strips can overlap by one pleat.
Join, close and flatten the rosette
- Mark and fold the strips. Fold every strip for one rosette before joining any of them.
- Join them into one long stack. Overlap the last pleat of one strip onto the first pleat of the next and stick them with double-sided tape. The join disappears inside a fold.
- Close the ring. Bring the two free ends together and tape them the same way. You now have a pleated tube, like a paper cuff.
- Flatten it. Stand the tube on the table, gather the top edge inward with your fingertips and push down. The top edge becomes the center and the bottom edge fans out into a circle. Hold it flat with one hand.
- Secure the center. Glue a paper circle over the center, pressing it into the tips of the pleats. Turn the rosette over while still holding it and glue a second circle on the back.
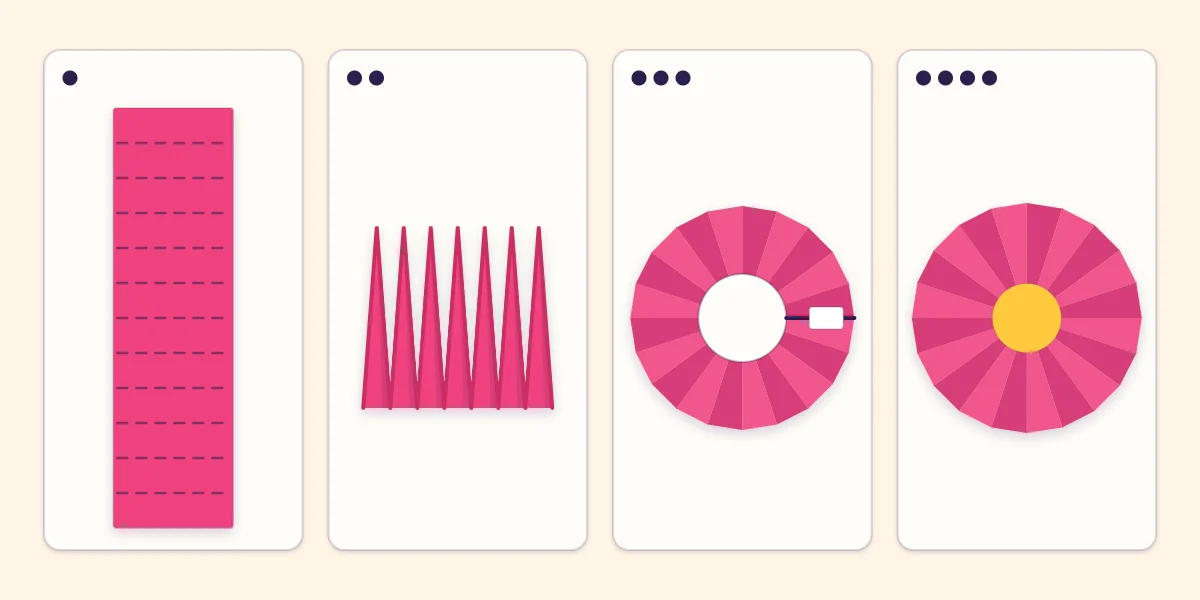
Why rosettes spring open, and how to stop it
A flattened rosette is under tension: every pleat is trying to return to a tube. A glue stick or a dab of school glue on a single side will not hold it. Three things keep it shut:
- A circle on both sides. The back circle does as much work as the front one, and it gives a flat place for tape when hanging.
- Enough glue, on the pleat tips. Hot glue grabs in seconds, which is why it is the usual choice, but it is an adult tool and can burn. Tacky glue also works: apply it generously, press the circle on and leave the rosette under a heavy book until set.
- Enough length. If the rosette fights hard, the strip is probably too short for its width. Add another strip.
The guide to glue and tape for party crafts compares the adhesives that suit this kind of joint.
Tip
Check a weighted rosette after a minute to make sure the center circles have not slid out of place.
Shape the outer edge
The edge is shaped before the ring is closed, while the strip is still a folded stack. Hold the stack tightly and trim one end (the end that will become the outside) through all the layers:
- Straight, left as it is, gives a plain circular edge.
- Pointed, cut at an angle to a peak, gives a spiky starburst edge.
- Rounded, cut in a curve, gives a scalloped edge.
Cardstock stacks are thick, so trim a few pleats at a time and use the first cut as the guide for the rest. Trim the same end of every strip in the rosette, or the shaped edge will end up half inside.

Centers, layers and hanging
A contrasting center circle is the simplest finish. For more depth, glue a small rosette onto the middle of a large one, or stack a scalloped circle under a plain one.
For a backdrop, make three sizes and overlap their edges in a loose cluster. Half-circle versions fill gaps along a straight edge such as a table front; see paper fan decorations for those. Hang rosettes by taping a loop of thread to the back circle, or with a removable adhesive on the back circle, tested on a hidden spot of the wall first. Keep them well away from candles and other heat.
Frequently asked questions
How long should the paper strip be for a rosette?
The total length should be about three to four times the finished diameter. For a 6 in (15 cm) rosette that means roughly 18 to 24 in (46 to 61 cm), which is two letter-length strips joined end to end.
Why does my paper rosette keep popping open?
The pleats are under tension and a light glue cannot hold them. Glue a circle to both the front and the back of the center with hot glue or a generous amount of tacky glue, and hold or weight it until set. If it still fights, the strip is too short and needs another section.
Can paper rosettes be made without a scoring tool?
Yes. With lighter paper, fold the strip in half repeatedly and then reverse every other crease. For cardstock, an empty ballpoint pen run along a ruler scores well enough to give clean folds.