DIY Paper Party Hats: A Simple Cone Hat From Cardstock
Draw a cone hat pattern with a pencil and string, decorate it flat, then roll and close it. Includes a size table and fixes for the usual problems.

Tutorial at a glance
Materials
- One sheet of cardstock, about 65 lb cover (176 gsm)
- Double-sided tape or liquid craft glue
- Clear tape to reinforce the holes
- Thin elastic cord, about 14 in (36 cm), or two ribbon ties
- Paper scraps and tissue paper for decoration
- A small pom-pom or paper star for the tip
DIY paper party hats need one sheet of cardstock each, a pencil, a piece of string and something to close the seam. The classic cone is a flat fan shape rolled until its two straight edges meet, so the whole project is really about drawing that fan accurately and curving it without creasing it.
There is no pattern to print here. The shape is drawn straight onto the cardstock with a homemade compass, which also means you can change the size in seconds. Plan on about 20 minutes for the first hat and much less for each one after it.
What you need
- Cardstock, US letter size, about 65 lb cover (176 gsm), one sheet per hat
- Pencil, ruler and about 10 in (25 cm) of string
- Scissors
- Double-sided tape, or liquid craft glue and two small clips
- Hole punch and clear tape
- Thin elastic cord, about 14 in (36 cm) per hat, or two ribbon ties
- Paper scraps, tissue paper and a small pom-pom or paper star for decorating
Draw and cut the pattern
The pattern is a sector of a circle: a fan with two straight edges that meet at a point and one curved edge. A radius of about 7 in (18 cm) and a little more than a third of the full circle give a hat roughly 5 in (13 cm) across at the base.
- Lay the sheet with a long edge toward you. Mark a point on that edge about 4 in (10 cm) from the left corner. This point becomes the tip of the hat.
- Tie the string around the pencil. Pin the string to the marked point with a fingertip so that 7 in (18 cm) of string runs between your finger and the pencil.
- Keeping the string taut, start with the pencil on the bottom edge at the right and swing it up and over until the line runs off the left side of the sheet. If it runs off the top or the right, shorten the string slightly and redraw.
- Rule a straight line from the marked point to the place where the curve meets the left edge. The bottom edge of the sheet is the other straight side.
- Add the glue tab: draw a second line parallel to the ruled one, 1/2 in (12 mm) outside the fan.
- Cut along the curve and the outer tab line. Leave the line between the fan and the tab uncut.
A slack string is what goes wrong most often here. It draws a wobbly curve, and a wobbly curve becomes a hat that rocks on the table. The guide to cutting, scoring and folding paper covers cutting smooth curves. Keep the first cutout as a tracing pattern for the rest of the set.

Decorate before you roll
A flat fan is easy to decorate and a cone is not, so do the decorating now. Keep everything clear of the glue tab and of the strip on the opposite edge that the tab will cover.
- Dots: punch circles from a second color and stick them on with a glue stick.
- Stripes: glue on narrow paper strips that fan out from the tip, then trim them flush with the edges. They become diagonal bands once the hat is rolled.
- Tissue fringe: cut a strip of tissue about 2 in (5 cm) tall, snip slits roughly 1/2 in (12 mm) apart along one side, and tape the uncut side along the inside of the curved edge so the fringe hangs below the base.
The pom-pom or paper star for the tip goes on last, after the cone is closed.
Roll, close and add the elastic
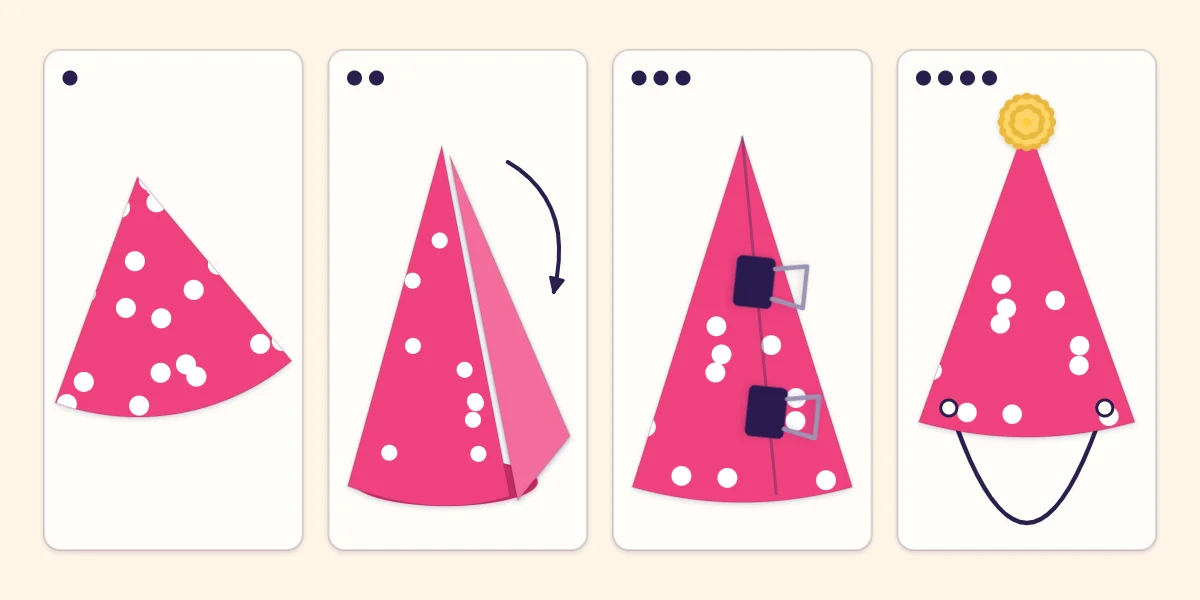
- Start with the flat decorated fan, decorated side down. Pull it gently over the edge of a table two or three times, working from one straight side to the other, so the cardstock takes on a curve.
- Curl it into a loose cone and check that the straight edge overlaps the tab line evenly from tip to base.
- Stick double-sided tape along the tab, peel the backing and press the seam closed from the tip downward. With liquid glue, spread a thin line on the tab and hold the seam with two small clips, one near the base and one higher up, until it sets.
- Punch two holes opposite each other about 1/2 in (12 mm) above the base, thread the elastic through from the outside and knot each end on the inside.
Double-sided tape is the faster choice because it holds at once; glue gives a neater seam but needs the clips. The guide to glue and tape for party crafts compares the two. Finish by fixing the pom-pom or star to the tip with a dot of tacky glue.
Safety note
Elastic cord, pom-poms and other small trims need care around young children. Ribbon ties are an alternative to elastic, and an adult should check the fit and stay close while hats are worn.
Changing the size
The radius sets the height of the hat and the width of its base together, so one measurement resizes everything.
| Radius | Base width, about | Use |
|---|---|---|
| 5 in (13 cm) | 3.5 in (9 cm) | Small perched hat |
| 7 in (18 cm) | 5 in (13 cm) | Standard party hat |
| 9 in (23 cm) | 6 in (15 cm) | Tall hat, needs a larger sheet |
For the 9 in version, use 12 x 12 in (30 x 30 cm) cardstock or poster board, because the fan no longer fits on a letter sheet.
Fixing common problems
- Flat spot at the seam: the cardstock was not curved enough before closing. Next time, give the two straight edges an extra pull over the table edge, since they are the stiffest part.
- Hat too narrow: the fan was too small a slice of the circle. Use a wider fan, or keep the same fan and overlap the seam less.
- Elastic tearing out: stick a small square of clear tape inside the hat where each hole will go, then punch through tape and cardstock together.
A matching crown
For the birthday person, a paper birthday crown in the same cardstock sets one hat apart from the rest. Undecorated fans also suit a make-and-take craft table: guests decorate them flat, and an adult tapes each seam afterward.
Frequently asked questions
What shape do you cut to make a cone party hat?
A cone hat starts as a fan-shaped sector of a circle with two straight edges and one curved edge. A radius of about 7 in (18 cm) and a little more than a third of the circle, plus a 1/2 in (12 mm) glue tab on one straight edge, makes a standard hat.
How do you keep the elastic from tearing out of a paper hat?
Stick a small square of clear tape on the inside of the hat where each hole will go, then punch through the tape and cardstock together. The tape spreads the pull of the elastic so the hole does not rip toward the edge.
Why does a paper party hat have a flat spot at the seam?
The cardstock was not curved enough before the seam was closed, so the stiff straight edges stayed flat. Pull the fan over a table edge several times, paying extra attention to the two straight sides, before taping it.