Handmade Birthday Place Cards: Three Easy Styles
Three place card styles cut from the same cardstock: a scored tent card, a small flag in a base and a tag tied to the napkin, with tips for straight handwriting and fast batches.

Tutorial at a glance
Materials
- White or light cardstock, about 65 lb (176 gsm)
- Colored cardstock scraps
- Toothpicks or paper straws for flags
- Corks, large wooden beads or removable mounting putty for bases
- Twine or narrow ribbon
Handmade birthday place cards take a few scraps of cardstock and about an evening, and they are one of the few decorations every guest picks up and looks at closely. That makes them a good place to spend a little care on clean folds and neat writing.
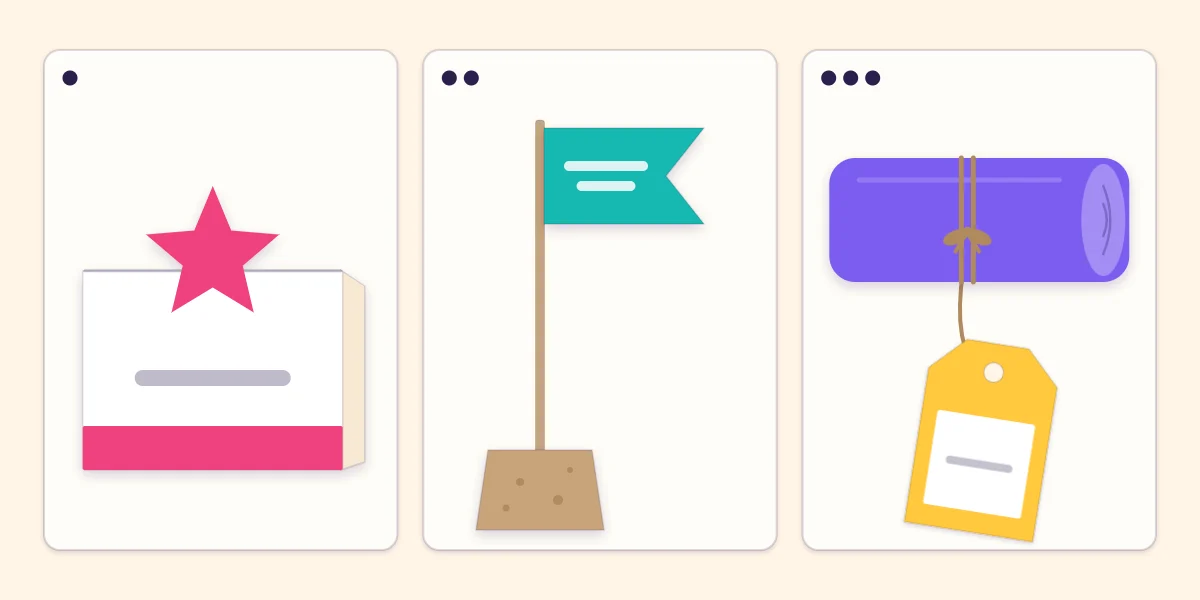
Three styles cover almost every table: a folded tent card, a small flag standing in a base, and a tag tied to the napkin or cup. All three are cut from the same paper, so you can choose one or mix them across two tables.
What you need
- White or light cardstock, about 65 lb (176 gsm), for the part that carries the name
- Colored cardstock scraps for bands and cut-paper shapes
- Toothpicks, wooden skewers trimmed short, or paper straws for the flag style
- Small bases for the flags: corks, large wooden beads or balls of removable mounting putty
- Twine or narrow ribbon for the tag style
- Scissors, ruler, pencil, eraser, glue stick, hole punch
- A bone folder, or an empty ballpoint pen, for scoring
- A pen or marker that does not smear on your cardstock
The three styles at a glance
| Style | Size to cut | Effort | Good for |
|---|---|---|---|
| Tent card | 3.5 x 4 in (9 x 10 cm), folded to 3.5 x 2 in | Low | Sit-down tables with room in front of each plate |
| Flag in a base | Strip about 1 x 4 in (2.5 x 10 cm) | Medium | Crowded tables; the flag stands above the plate |
| Tied tag | About 2 x 3 in (5 x 7.5 cm) | Low | Casual tables, cups and napkins that need labeling |
The tent card is the most stable and gives the most writing room. The flag takes the least table space. The tag has no fold to get wrong and doubles as a cup label, which is useful when several identical cups end up on one table.
Write the names first
Write every name while the card is still a flat, undecorated blank. A spelling mistake at this stage costs one small rectangle; after the shapes are glued on, it costs the whole card. Cut two or three spare blanks for the same reason.
- Rule a faint pencil baseline where the name will sit. On a tent card that is the lower half of the blank, about 1/2 in (12 mm) up from the bottom edge.
- Lightly pencil the name, starting from the middle letter and working outward if you want it centered.
- Go over it in pen with slow, even strokes, and let the ink dry fully.
- Erase the pencil line only when the ink no longer shines.
Short names can be written larger; long names need smaller letters rather than letters squeezed together at the end. Penciling first is what shows you which is which.
Style 1: the tent card
- Cut a blank 3.5 in wide and 4 in tall (9 x 10 cm).
- Mark the halfway point, 2 in (5 cm), on both side edges.
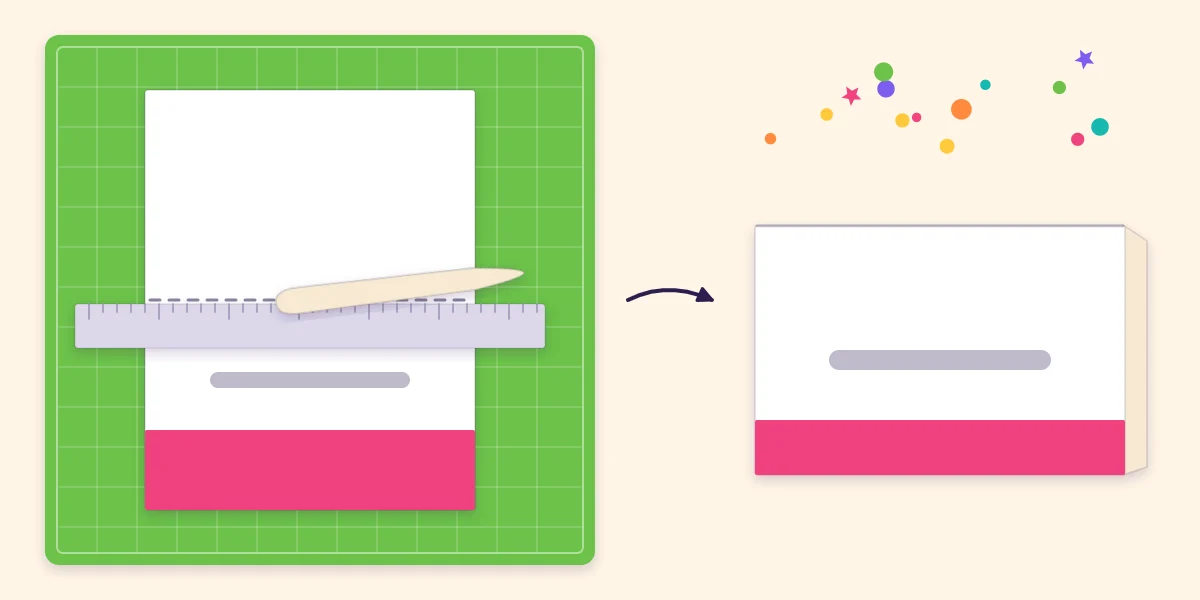
- Lay a ruler across the two marks and score along it with a bone folder or an empty ballpoint pen, pressing firmly but not hard enough to tear the surface.
- Fold along the score with the scored line on the outside of the fold and sharpen the crease with the bone folder.
- Glue a colored band about 1/2 in (12 mm) tall along the bottom of the front face.
- Cut a small shape, such as a star or a crown about 1.5 in (4 cm) across, and glue only its lower half to the front so the upper half rises above the fold.
Scoring is what makes the card stand square. An unscored fold in cardstock wanders, cracks along the ridge and leaves one face longer than the other, so the card leans or slides flat. If your folds come out rough, the guide on cutting, scoring and folding paper explains the pressure and tools in more detail.
Style 2: a flag in a small base
Cut a strip about 1 in wide and 4 in long (2.5 x 10 cm) and write the name on the right-hand half. Run a glue stick over the back, lay a toothpick or straw across the middle and fold the strip in half around it, pressing the two halves together. Trim the free end straight, or cut a small V into it for a swallowtail.
Push the stick into a base. A cork standing on its flat end works well; so does a large wooden bead or a ball of removable mounting putty pressed onto the table. If the flag spins, add a dot of tacky glue where the stick enters the base.
Watch out
Toothpicks are sharp and beads are small. For a table of young children, use paper straws in a wide base, or choose the tent card instead.
Style 3: a tag tied to the napkin or cup
Cut a rectangle about 2 x 3 in (5 x 7.5 cm), clip the two top corners at an angle and punch a hole between them. Write the name, thread 12 in (30 cm) of twine through the hole and tie it around a rolled napkin or the stem or handle of a cup. Layering the white rectangle on a slightly larger colored one gives it a border with one extra cut.
This is the same construction used for handmade party favor tags, so one cutting session can supply both the table and the favor bags.
Making a batch that matches
Work in stages rather than finishing one card at a time. Cut long strips 3.5 in (9 cm) wide first, then chop them into blanks, so every card has the same width without measuring each one. Score them all, write them all, then decorate them all. Stacking four layers of scrap paper and cutting through the stack gives you four identical stars per cut.
Tip
Repeat one shape and two colors from the rest of the table. If you are making paper cupcake toppers, cut a few extra of the same small stars or circles and use them on the place cards.
Store finished tent cards folded flat under a book until the party so they open crisply, and set them out last, once plates and cups are in place.
Frequently asked questions
What size should a tent place card be?
A piece 3.5 in wide and 4 in tall (9 x 10 cm), scored across the middle, folds to a card 3.5 x 2 in. That is wide enough for most first names and small enough to sit above a plate without crowding it.
How do I keep handwriting straight on a place card?
Rule a faint pencil baseline, pencil the name lightly, then go over it in pen. Erase the pencil only after the ink is fully dry. Writing on the flat blank before folding or decorating also keeps your hand steady and makes mistakes cheap to redo.
Why does my tent card fall over or lean?
The fold is usually off-center or was made without scoring, so one face is longer than the other. Mark the halfway point on both side edges, score against a ruler, and fold along the score. A card cut from very thin paper will also sag; use cardstock.