Paper Cupcake Toppers: How to Make a Matching Set
How to cut and assemble round layered toppers, flag toppers and mini rosettes on picks, and how to batch a dozen so they all match.

Tutorial at a glance
Materials
- Cardstock, about 65 lb (176 gsm), in two or three colors
- White cardstock
- Text-weight colored paper for mini rosettes
- Toothpicks or paper lollipop sticks
- Tacky glue for rosette centers
A plain tray of cupcakes turns into part of the decorations as soon as each one carries a small paper shape on a pick. Paper cupcake toppers are quick to cut, use up cardstock scraps, and are easiest to make as a matching set in one sitting rather than one at a time.
This is a paper craft from start to finish: circles, flags and tiny rosettes on sticks, sized so a dozen come out of less than one sheet per color.
What you need
- Cardstock, about 65 lb (176 gsm), in two or three colors plus white
- Toothpicks or paper lollipop sticks, one per topper
- Text-weight colored paper for the mini rosettes (it folds more easily than cardstock at this size)
- Scissors, pencil, ruler
- Something round to trace: a bottle cap or small lid about 2 in (5 cm) across, and a coin about 1.25 in (3 cm) across
- Glue stick and double-sided tape; tacky glue for the rosettes
- Optional: a circle punch or scalloped circle punch
A punch is faster and cuts cleaner edges, but nothing here depends on one. Traced circles cut with small, sharp scissors look just as good if you turn the paper into the blades instead of steering the scissors.
Three kinds of topper
| Type | Finished size | Effort | Notes |
|---|---|---|---|
| Round layered | About 2 in (5 cm) across | Medium | Most room for color and a small shape |
| Flag | About 3/4 x 1.5 in (2 x 4 cm) | Low | Fastest; good for filling out a large batch |
| Mini rosette | About 1.5 to 2 in (4 to 5 cm) across | Higher | Most texture; make a few as highlights |
A set does not need to be all one type. Eight round toppers, three flags and one rosette for the birthday person’s cupcake look coordinated as long as the colors repeat.
Round layered toppers
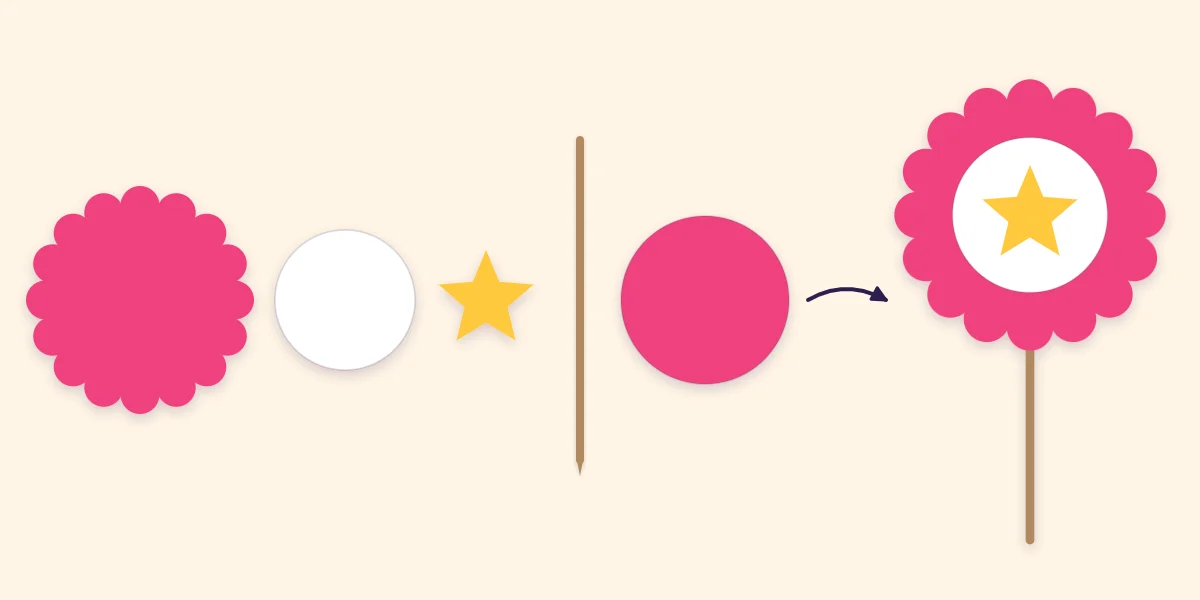
Each round topper has five parts: a scalloped or plain base circle, a smaller white circle, a small shape, the pick, and a plain back circle the same size as the base.
- Trace and cut the base circle, about 2 in (5 cm) across. For a scalloped edge without a punch, draw the circle, then cut small half-moon bites all the way around the line.
- Cut a white circle about 1.25 in (3 cm) across, and a plain back circle the same size as the base.
- Cut a small shape that fits inside the white circle: a star, a heart or a dot about 3/4 in (2 cm) across.
- Glue the white circle to the center of the base and the shape to the center of the white circle.
- Turn the base face down. Tape the top 3/4 in (2 cm) of the pick to the back so it points straight down from the center.
- Cover the back with glue stick or double-sided tape and press the back circle on, sandwiching the pick.
The back circle matters for two reasons. It hides the tape, so the topper looks finished from behind, and it grips the pick so the paper cannot spin or slide down. Without it, toppers tend to droop to one side within an hour.
Flag toppers and mini rosettes
Flags
Cut a strip about 3/4 in wide and 3 in long (2 x 7.5 cm). Cover the back with glue stick, lay the pick across the middle and fold the strip in half around it. Press the halves together and cut a V into the free end for a swallowtail. If a flag slides down the pick, the glue did not reach the fold; add a small piece of double-sided tape right at the stick.
Mini rosettes
Cut a strip of text-weight paper about 3/4 in wide and 8 to 9 in long (2 x 22 cm). Accordion fold it in folds about 1/4 in (6 mm) wide, glue the two ends together to make a ring, then press the ring flat and hold the center with a dot of tacky glue and a small paper circle on each side. The strip’s width becomes the rosette’s radius, so this makes a rosette about 1.5 in (4 cm) across. Tape the pick to the back before adding the back circle. The same folding at full scale is covered in the guide to paper rosettes.

Making a matching set in one session
Assembling one topper completely before starting the next is the slow way, and the set drifts as you go. Work like a small production line instead:
- Decide the set: two or three colors, one shape, and how many toppers. Add two spares.
- Cut all the base circles and back circles.
- Cut all the white circles, then all the small shapes. Stack three or four layers of paper to cut several at once.
- Lay the bases in a row and glue every white circle, then every shape.
- Flip the row, tape all the picks, then close all the backs.
- Press the finished toppers under a book for a few minutes so the layers bond flat.
Tip
Alternate the base colors but keep the white circle and the small shape identical on every topper. One repeated element is what makes mixed colors read as a set.
Cut a few extra shapes while the paper is out. The same stars or hearts can decorate handmade place cards, and for the main cake a mini bunting cake topper in the same colors ties the whole table together.
Keeping paper and glue clear of the food
Treat toppers as decorations that happen to stand in a cupcake. A few habits keep the paper and adhesive away from anything that will be eaten:
- Only the bare lower part of the pick goes into the cupcake. Keep all tape and glue in the top 3/4 in (2 cm), inside the paper sandwich.
- Leave enough bare stick that the paper sits above the surface rather than resting on it. Paper that touches a moist surface soaks, curls and can bleed color.
- Add the toppers shortly before serving, not hours ahead.
- Take each topper off before the cupcake is eaten.
Safety note
Toothpicks are sharp and easy to miss. For young children, use blunt paper lollipop sticks, remove the toppers yourself before handing cupcakes out, and keep paper toppers away from lit candles.
Storing toppers until the party
Toppers can be made a week or more ahead. Lay them flat in a shallow box in a single layer, or stand them in a block of foam or an upturned egg carton with small holes poked in it. Keep the box somewhere dry.
Frequently asked questions
What size should a round cupcake topper be?
A base circle about 2 in (5 cm) across suits a standard cupcake: large enough to see, small enough not to tip the pick. The contrast circle on top can be about 1.25 in (3 cm), with a small shape around 3/4 in (2 cm) in the center.
Can I make cupcake toppers without a circle punch?
Yes. Trace a bottle cap or small lid with a pencil and cut just inside the line with small scissors, turning the paper as you cut. For a scalloped edge, cut small half-moon bites around the traced circle.
How do I stop the topper from spinning or sliding down the pick?
Tape the top of the pick to the back of the base, then glue a second circle over it so the stick is sandwiched between two layers. Pressing the finished topper under a book for a few minutes helps the layers grip the pick.