Paper Fan Decorations: Half Fans, Layered Fans and Wall Clusters
Fold half-circle paper fans from single sheets, layer and join them, and arrange three sizes into a wall cluster for a birthday party.

Tutorial at a glance
Materials
- Cardstock, wrapping paper or doubled tissue paper
- Clear tape or staples for the pinched end
- Glue stick or double-sided tape
- Scrap cardstock for backing strips
A half-circle fan is the quickest folded decoration there is: one accordion-folded rectangle, pinched at one end and opened out. Paper fan decorations are flat along the bottom, so they sit neatly on a shelf line, along the front of a table or across the back of a chair, in places where a full circle would look awkward.
They also need less paper and less glue than a full medallion. If you want complete circles with a secured center, the paper rosette tutorial covers that build and the folding basics in more depth; this guide concentrates on half fans and what to do with them.
What you need
- Paper: cardstock of about 65 lb (176 gsm), wrapping paper or doubled tissue paper
- A ruler, a pencil and scissors
- A bone folder or an empty ballpoint pen if you are using cardstock
- Clear tape or a stapler for the pinched end
- A glue stick or double-sided tape for joining and layering
- Scrap cardstock for backing strips
Make a half fan from one sheet
The fold length of the rectangle becomes the fan’s radius, and the rectangle should be at least three times as long as that. A strip 3.5 in (9 cm) wide cut along the length of a letter sheet is a reliable first size: it opens to a fan about 7 in (18 cm) across, and one sheet gives two of them.
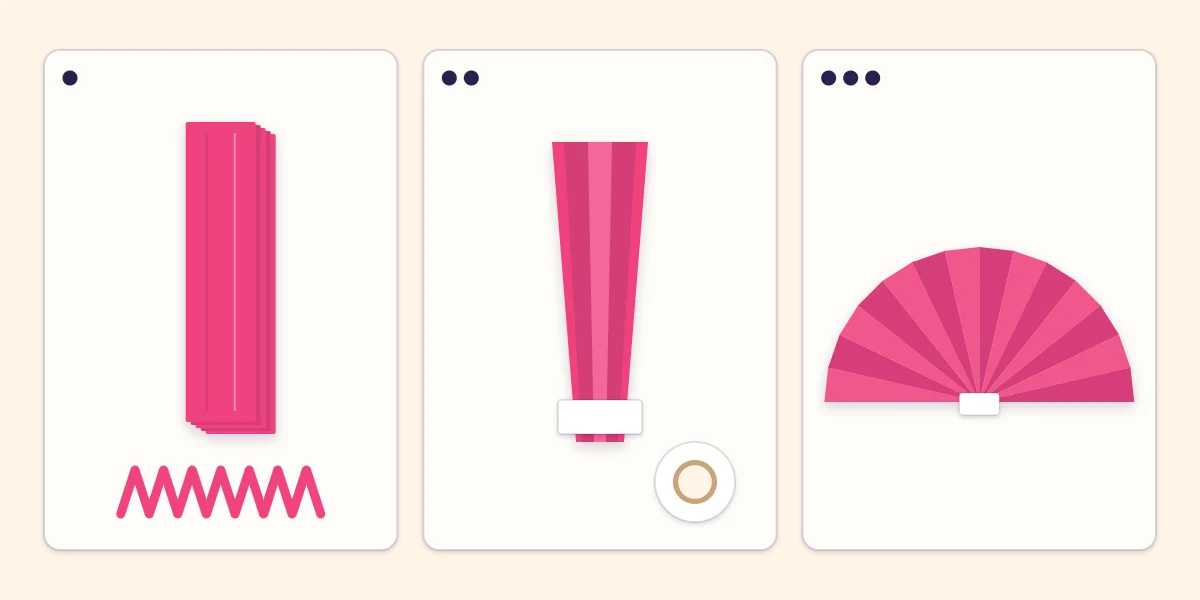
- Fold. Accordion-fold the rectangle from one short end to the other in pleats about 1/2 in (12 mm) wide, keeping every fold parallel to the first. Press the finished piece into a tight, narrow stack and run a fingernail down each side.
- Pinch and tape. Squeeze one end of the stack and wrap a piece of clear tape tightly around it, about 1/4 in (6 mm) from the end, or staple straight through. This is the fan’s center point.
- Open. Hold the taped end and pull the two outer pleats down and apart until they lie in a straight line. The loose end spreads into a half circle.
A fan left like this slowly closes. To lock it open, glue a strip of scrap cardstock across the back along the straight bottom edge, or tape the two outer pleats directly to the wall when hanging. Cardstock fans fold more cleanly if the pleat lines are scored first, as explained in the guide to cutting, scoring and folding paper.
Fan sizes from common paper sizes
For larger fans, join rectangles end to end by overlapping one pleat with double-sided tape before pinching. These sizes are starting points.
| Paper | Rectangle to fold | Pleat width | Finished fan |
|---|---|---|---|
| Letter sheet, cut into strips | 3.5 x 11 in (9 x 28 cm) | 1/2 in (12 mm) | About 7 in (18 cm) wide |
| Letter sheet, halved lengthwise and joined, then trimmed | 4.25 x 15 in (10.8 x 38 cm) | 1/2 in (12 mm) | About 8.5 in (21.6 cm) wide |
| 12 in (30.5 cm) square paper, halved and joined | 6 x 24 in (15 x 61 cm) | 3/4 in (2 cm) | About 12 in (30 cm) wide |
| Wrapping paper from a roll | 10 x 36 in (25 x 91 cm) | 1 in (2.5 cm) | About 20 in (50 cm) wide |
Paper choices and what each does
Cardstock holds a sharp pleat and keeps its shape for reuse, but it is stiff at the pinched end. Keep cardstock fans small to medium and staple rather than tape.
Wrapping paper is the easy way to make large fans: it comes in long pieces, folds without scoring and brings pattern into the cluster. It is thin, so large fans may droop at the tips unless the pleats are 1 in (2.5 cm) wide and firmly creased.
Tissue paper on its own is too soft. Use two or three sheets stacked as one, or glue a tissue sheet lightly to plain paper with a glue stick before folding.
Layered fans, full circles and edges
Layered fans. Make a second fan about two thirds the size of the first in a contrasting color. Line up the two taped points and the straight bottom edges, then glue the small fan on top with a few dabs of glue on its pleat ridges. A paper half circle glued over both points hides the tape.
Full circles. Two half fans of the same size placed straight edge to straight edge make a circle. Tape the outer pleats to each other on the back and cover the middle with a paper circle on both sides.
Scalloped or pointed edge. Before opening, trim the loose end of the folded stack in a curve for scallops or at an angle for points.
Fringed edge. Glue a strip of tissue about 1.5 in (4 cm) wide along one long edge of the flat rectangle so that it overhangs, snip the overhang into fringe, then fold as usual.
Tip
Fold all the fans for a cluster before opening any of them. Folded stacks are easy to carry and store; opened fans crush.
Compose a wall cluster
A cluster reads as one large shape from across the room. A few habits keep it from looking scattered:
- Lay it out on the floor first. Move pieces around until the outline pleases you, then transfer them to the wall one at a time.
- Start with the largest fan and place it slightly off center. Build outward from it.
- Mix three sizes. One or two large, a few medium, and small ones to fill gaps. Seven fans is plenty above a table.
- Overlap the edges. Tucking the tip of one fan behind its neighbor ties the group together; gaps between fans make each one look lost.
- Keep to three or four colors, repeated from the rest of the room.
Hang them with a removable adhesive on the backing strip, tested on a hidden spot first. The room-planning guide to handmade birthday decorations explains where a cluster like this fits with the banner and the table.
Fans on the table and chairs
Because the bottom edge is straight, small fans can run in a row along the front edge of a table covering, points up, like a pleated border. Tape each backing strip to the cloth from behind. A single medium fan taped or tied with ribbon to a chair back marks the birthday seat.
A fan glued to a paper straw or a dowel becomes a pick for a jar, which is one way to add height to DIY birthday centerpieces.
Watch out
Keep paper fans away from candles, lamps and any other heat source, especially those on or near the table.
Frequently asked questions
How much paper does a half-circle fan need?
The rectangle should be at least three times as long as it is wide, because the width becomes the fan's radius. A 3.5 x 11 in (9 x 28 cm) strip opens into a fan about 7 in (18 cm) across.
How do you keep a paper fan open?
Glue a strip of scrap cardstock across the back along the straight bottom edge, or tape the two outer pleats flat to the wall. Without one of these, the pleats slowly pull the fan closed.
What is the difference between a paper fan and a paper rosette?
A fan is a half circle made from one pinched accordion stack, with a flat bottom edge. A rosette is a full circle made from a longer strip joined into a ring and secured at the center on both sides.