Tissue Paper Pom-Poms: How to Fold, Cut and Fluff Them
Stack, fold, tie and trim tissue paper, then fluff it into a round pom-pom without tearing the layers. Includes sizes, two-color and half poms.

Tutorial at a glance
Materials
- 8 to 10 standard sheets of tissue paper
- Thin craft wire, a twist tie or string
- Thread or thin string for hanging
Tissue paper pom-poms start as a flat stack of sheets and end as a ruffled ball the size of a beach ball, with nothing in between but folding, one tie and some patient fluffing. They are the standard way to fill the space above a party table, because they are large, nearly weightless and cost only a few sheets of tissue each.
The folding takes five minutes. The fluffing is where pom-poms are made or ruined, so most of this guide is about separating the layers without tearing them.
What you need
- Tissue paper: 8 to 10 standard sheets for each large pom-pom
- Thin craft wire, a twist tie or strong string, about 6 in (15 cm)
- Sharp scissors
- Thread or thin string for hanging
- A ruler, for the first fold only
Eight sheets make a full, round pom-pom. Ten make a denser one that hides its center better but takes longer to fluff. Fewer than seven tends to leave gaps.
Sheet sizes and finished sizes
The finished pom-pom is a little smaller than the length of the folded stack, because the layers curve as they lift. Cut the sheets down to change the size; the method stays the same.
| Sheets to stack | How many | Finished size |
|---|---|---|
| Full standard sheets, about 20 x 30 in (50 x 76 cm) | 8 to 10 | Large, about 16 to 18 in (40 to 46 cm) |
| Half sheets, about 15 x 20 in (38 x 50 cm) | 8 | Medium, about 12 in (30 cm) |
| Quarter sheets, about 10 x 15 in (25 x 38 cm) | 6 to 8 | Small, about 8 in (20 cm) |
| Full or half sheets, for a half pom | 4 to 5 | A dome that sits flat on a wall |
Three sizes hung together look better than a row of identical ones.
Fold, tie and trim
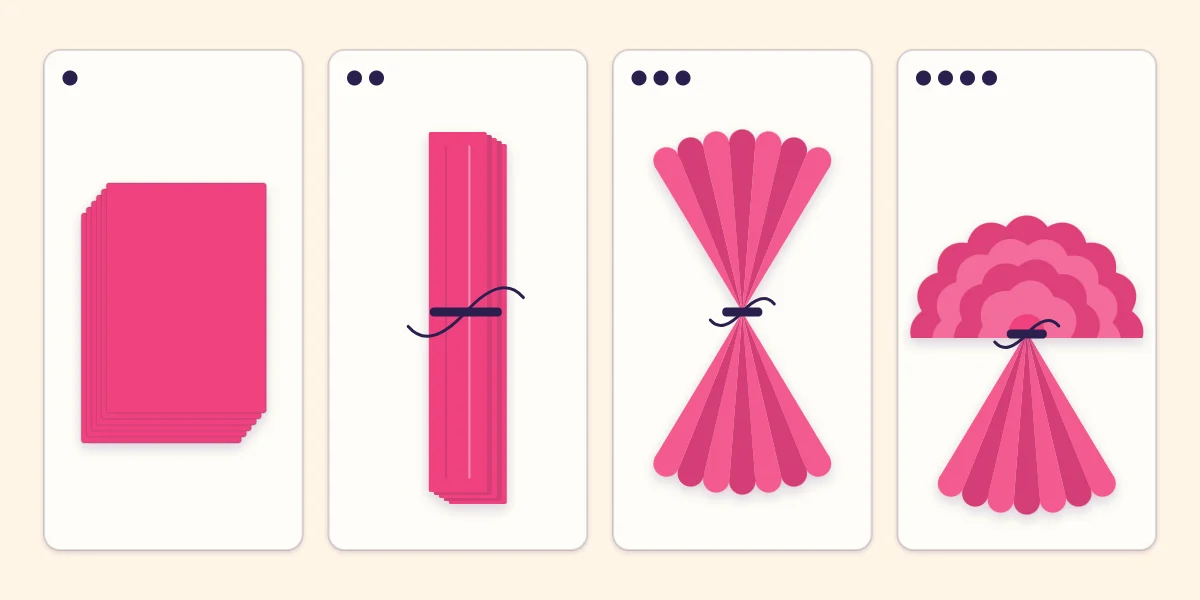
- Stack the sheets. Lay 8 to 10 sheets exactly on top of each other on a clean table, edges lined up, and smooth them flat.
- Accordion-fold and tie. Starting at one edge, fold the whole stack over by about 1.5 in (4 cm), flip it and fold back the same width. Continue to the far edge, creasing each fold firmly. Find the middle of the folded strip by bending it gently in half, then wrap the wire or twist tie around that point. Snug is right; tight enough to crumple the paper makes the center hard to fluff. Tie a long hanging thread to the wire now.
- Trim the ends and fan them. Cut both ends of the strip into a rounded tip through all the layers, then spread each side into a fan so that the piece looks like a bow tie.
- Fluff. Lift the layers one at a time toward the center until one side forms half a ruffled ball, then do the other side. The next section covers this in detail.
Even fold width matters more than exact width. If the folds wander, the petals come out different lengths and the pom-pom looks ragged on one side.
How to fluff without tearing
Tissue tears when it is pulled by its outer edge, because all the force lands on one thin spot. The fix is to work from the middle.
- Pull near the center. Slide your fingers down a layer until they are close to the tie, then ease that layer up and toward the center. The edge follows without being touched.
- One layer at a time. Separate the top sheet fully before starting the next. Two sheets pulled together stay stuck together.
- Alternate sides. Lift half the layers on one side, then half on the other, then go back for the rest. Turning the pom-pom over halfway makes the last layers easier to reach and keeps the ball round.
- Go slowly at the tie. The last inch (2.5 cm) of each layer is where the paper is pinched. Wiggle rather than pull.
A small tear disappears among the ruffles. When every layer is up, hold the pom-pom by its thread and nudge layers into any flat spots.
Tip
Dry hands grip tissue badly and damp hands mark it. Wipe your hands, then handle each layer with the pads of your fingers rather than your nails.
Rounded or pointed ends
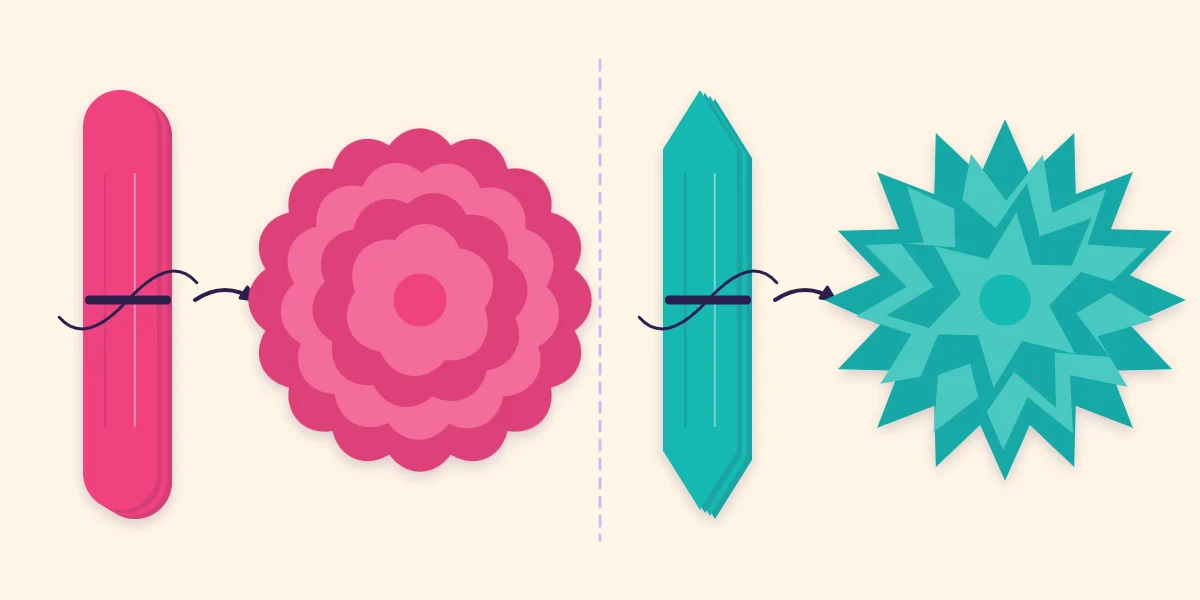
The trim in step three decides the pom-pom’s character. A rounded tip gives soft, petal-like edges, something like a peony. A pointed tip, cut to a peak like the end of a picket fence, gives a spiky, starry ball.
Cut through all the layers at once so every petal matches. If the stack is too thick for your scissors, cut it in two passes, using the first half as the guide for the second. Both ends of the strip should get the same trim.
Two-color and half pom-poms
Two colors. Stack four sheets of one color on four of another for a pom-pom that is one color on top and another below. For a center of a different color, put two sheets of the accent in the middle of the stack.
Half poms. Use four or five sheets and fluff every layer toward the same side. The result is a dome with a flat back, which can be fixed to a wall with a loop of removable tape (test it on a hidden spot first) or laid on a table.
The same tissue, cut into fringe instead of fluffed, makes a tissue paper tassel garland, and the two look good in matching colors.
Hanging, transporting and reviving
Hang pom-poms from their threads at different heights, with the largest highest. Tie the threads to a length of string stretched across the room, or tape each thread to the ceiling with a removable tape. They work best as the overhead piece in a room; the guide to planning handmade birthday decorations shows how they fit with a banner and table decor.
Fluffed pom-poms do not travel well. If the party is elsewhere, fold, tie and trim at home, carry them as flat strips and fluff them on site. Allow about ten minutes each.
A crushed pom-pom can usually be revived by lifting its layers again from the center, though it will never be quite as round. Whether a used one is worth keeping is covered in the guide to storing reusable party decorations.
Safety note
Tissue paper burns quickly. Hang pom-poms well clear of candles, light bulbs, heaters and anything else that gets hot.
Frequently asked questions
How many sheets of tissue paper make a pom-pom?
Eight to ten sheets make a full, round pom-pom. Small ones from quarter sheets can use six to eight, and a half pom that sits flat against a wall needs only four or five.
Why does the tissue tear when fluffing a pom-pom?
It usually tears because a layer is pulled by its outer edge. Hold each layer close to the center tie instead and ease it upward one sheet at a time, slowing down for the last inch near the tie.
Can tissue pom-poms be made ahead of time?
Yes. Fold, tie and trim them in advance and keep them as flat strips, which store and travel easily. Fluff them where they will hang, allowing about ten minutes for each one.