DIY Pillow Favor Boxes From Cardstock
How to draw a pillow box with a ruler and a round lid, score the curved flaps so they close cleanly, and glue, fill and band the finished box.

Tutorial at a glance
Materials
- Cardstock, about 80 lb (216 gsm)
- Double-sided tape or tacky glue
- Contrasting paper strips for bands
- Twine or ribbon
A pillow box is the simplest box there is: one piece of cardstock, one glued seam and four curved flaps that push in to close it. DIY pillow favor boxes need no printed pattern either. A ruler draws the straight lines and a round lid or small plate draws the curves.
The shape comes from those curved scores. When the flaps fold in along them, the flat tube bows outward and holds itself shut, which is why accurate scoring matters more here than in almost any other paper project.
What you need
- Cardstock, about 80 lb (216 gsm) for the best balance of stiffness and clean scores; 65 lb (176 gsm) works for small boxes
- A ruler and a sharp pencil
- A round lid, saucer or small plate about one and a half times as wide as one box panel
- A bone folder or an empty ballpoint pen for scoring
- Scissors
- Double-sided tape or tacky glue for the seam
- Paper strips, twine or ribbon for closing bands
Very heavy cardstock, above about 100 lb (270 gsm), tends to crack along curved scores.
How the pattern works
The pattern is a rectangle. Its width is twice the width of the finished box plus a 1/2 in (12 mm) glue tab; its height is the length of the finished box. Two straight score lines divide it into two equal panels and the tab. At both ends of each panel, an arc curves inward from corner to corner. Those four arcs become the end flaps.
| Box size | Cut the rectangle | Lid to trace | From one letter sheet |
|---|---|---|---|
| Small, 2.5 in (6.5 cm) wide | 5.5 x 4 in (14 x 10 cm) | About 3.5 to 4 in (9 to 10 cm) | 4 boxes |
| Medium, 3 in (7.5 cm) wide | 6.5 x 5 in (16.5 x 12.5 cm) | About 4.5 in (11.5 cm) | 2 boxes |
| Large, 4 in (10 cm) wide | 8.5 x 7 in (21.5 x 18 cm) | About 6 in (15 cm) | 1 box |
Drawing the pattern with a round lid
These steps make the medium box. Work on the inside face of the cardstock so pencil marks end up hidden.
- Cut a rectangle 6.5 in wide and 5 in tall (16.5 x 12.5 cm).
- Measuring from the left edge, rule a vertical line at 3 in (7.5 cm) and another at 6 in (15 cm). You now have two 3 in panels and a 1/2 in tab on the right.
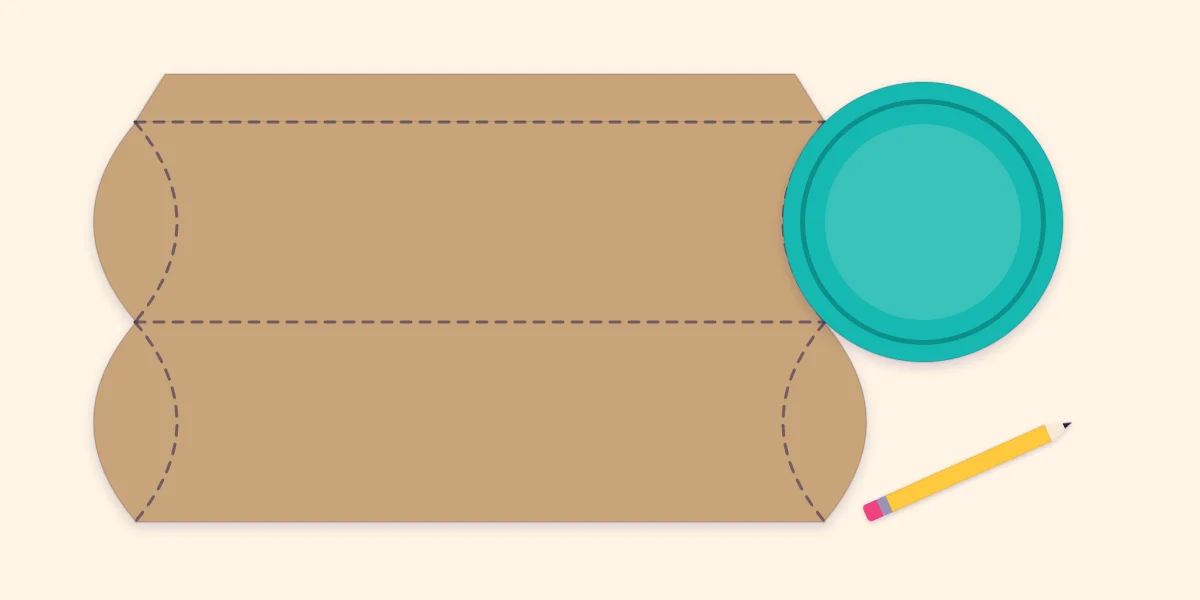
- Lay the lid on the first panel so its rim touches both top corners of the panel and dips into the panel between them. Trace that arc. With a lid about 4.5 in across, the arc dips roughly 1/2 in (12 mm) at its deepest point.
- Repeat at the bottom of the same panel, then at the top and bottom of the second panel. Check that all four arcs dip the same amount.
- Trim the two corners of the tab at an angle so they will not catch on the flaps.
The lid has to be wider than the panel. A lid the same width as the panel draws a deep half circle that leaves no room inside the box; a much larger plate draws an arc so shallow that the flaps will not stay closed.
Scoring the straight lines and the curves
Score the two straight lines against the ruler first. For the arcs, put the lid back in exactly the position you traced it and run the bone folder or empty pen around its rim, as if tracing again but with firm pressure. The lid guides the tool; a freehand curved score wobbles, and a wobbly score gives a lumpy fold.
Score on the inside face, the one you drew on. Fold the straight lines and sharpen the creases, then gently pre-fold each arc with your thumbs so the flaps already know which way to go. The guide to cutting, scoring and folding paper covers scoring tools and pressure if your lines are tearing or not showing.
Tip
Decorate now, while the piece is flat. Stamped dots, glued stripes or a paper shape on one panel are easy at this stage and nearly impossible on a curved, finished box.
Gluing and closing the box
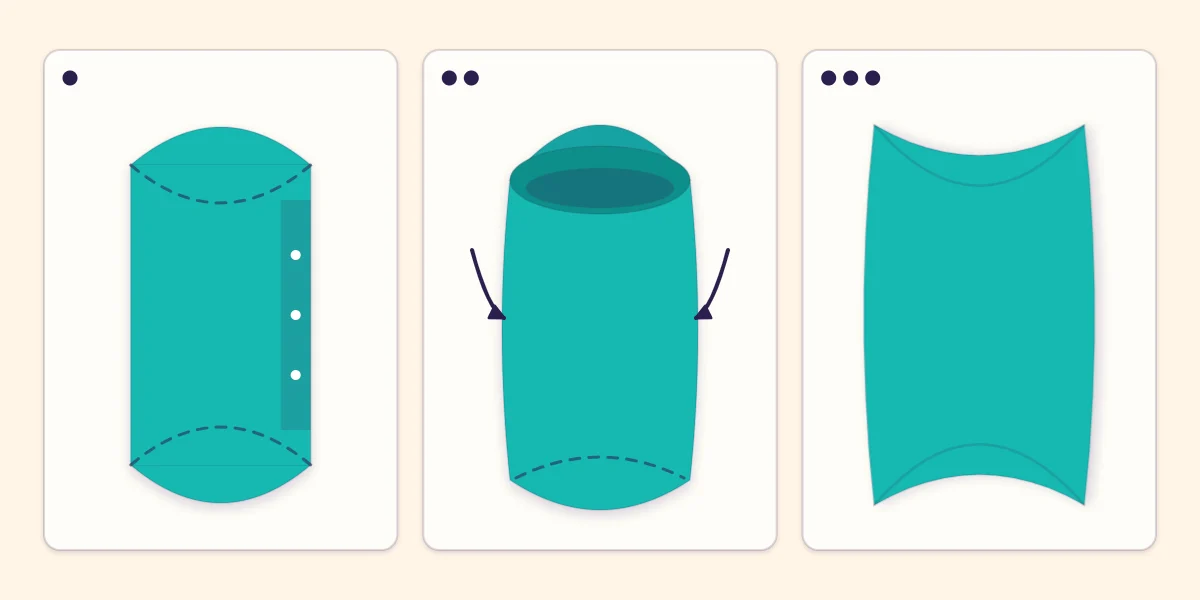
- Glue the tab. Put double-sided tape or a thin line of tacky glue on the outside of the tab. Fold the piece in half along the center score and press the far edge of the first panel onto the tab, edges aligned. You now have a flat tube.
- Open the tube. Squeeze the two folded sides gently toward each other so the tube opens into a shallow oval.
- Push the flaps in. At one end, press one flap in along its arc, then the other over it. Fill the box, then close the other end the same way.
Double-sided tape gives an instant seam. With glue, hold the seam under a book for a few minutes before opening the tube, or it will slide apart; the glue and tape guide compares the options for cardstock boxes.
Bands, twine and what fits inside
A closed pillow box holds itself shut, but a band makes it secure and finishes the look. Wrap a strip of contrasting paper about 3/4 in (2 cm) wide around the middle and tape it at the back, or tie twine around the box lengthwise and crosswise. A small tag slipped under the twine carries a name.
The usable space is smaller than the flat panel suggests, because the flaps take up room at both ends and the box is thickest only in the middle. The medium box holds flat or small items up to about 2.5 x 3.5 in (6.5 x 9 cm) and under 1 in (2.5 cm) thick. For anything bulkier or heavier, decorated paper favor bags are the better container.
Fixing common problems
- Flaps pop open. The arcs are too shallow or not scored firmly enough. Re-score them, pre-fold each flap sharply, and add a band. On the next box, use a slightly smaller lid.
- Cracked scores. The cardstock is too heavy or was folded against its grain. Score in two lighter passes, and try turning the pattern a quarter turn on the sheet for the next one.
- Lopsided curves. The lid shifted between arcs. Mark the deepest point of each arc with a ruler before tracing, so every arc dips the same distance.
- The seam shows a gap. The tab score was off, making one panel narrower. Measure both panels before scoring; they must match exactly.
Frequently asked questions
What cardstock weight is best for pillow boxes?
Cardstock around 80 lb (216 gsm) is stiff enough to hold the curve and still scores cleanly. Lighter 65 lb (176 gsm) cardstock is fine for small boxes. Very heavy stock tends to crack along the curved scores unless it is scored in two light passes.
Why do the end flaps of my pillow box keep popping open?
The curved scores are usually too shallow or too lightly pressed. Re-score each arc against the lid with firm pressure, pre-fold the flaps before assembly, and trace a slightly smaller lid on the next box so the arcs dip deeper. A paper band or twine holds stubborn flaps shut.
How many pillow boxes can I cut from one sheet of cardstock?
From one US letter sheet you can cut four small boxes about 2.5 in (6.5 cm) wide, two medium boxes about 3 in (7.5 cm) wide, or one large box about 4 in (10 cm) wide. The large size uses the full width of the sheet.