Party Favor Bags: How to Decorate Plain Paper Bags
Six ways to decorate and close plain paper bags for party favors, from a ribbon-tied fold to eraser-stamped dots and a cut window, plus a batch workflow for a full set.
Tutorial at a glance
Materials
- Plain kraft or white paper bags
- Cardstock, about 65 lb (176 gsm), in two colors
- Tissue paper or crepe paper streamer
- Ribbon or twine
- Small wooden clothespins (optional)
- Ink pad or craft paint
- Clear sheet for windows (optional)
Plain paper lunch bags cost very little, come in stacks and take glue, ink and scissors well, which makes them the easiest base for handmade party favor bags. The craft is in the decoration and the closure: what goes on the front, and how the top is folded shut.
Six treatments are covered here, from a two-minute ribbon tie to a cut window. Pick one or two and repeat them across the whole set; ten bags done the same way look far better than ten different experiments.
What you need
- Plain paper bags: kraft or white lunch bags, or small flat paper bags without a gusset
- Cardstock, about 65 lb (176 gsm), in two colors
- Tissue paper or a crepe paper streamer for fringe
- Ribbon or twine, and small wooden clothespins if you like that closure
- Scissors, ruler, pencil, hole punch, glue stick, double-sided tape
- For stamping: a new pencil with a flat eraser and an ink pad or a little craft paint on a plate
- For windows: a craft knife and cutting mat, and a clear sheet such as a cut-up page protector
Decorate flat, fill later
Do all the decorating while the bags are still folded flat, exactly as they come out of the pack. A flat bag is a smooth, firm surface; a filled bag bulges, so stamps skip, glued shapes lift at the edges and punched holes tear.
Slide a piece of scrap cardstock inside each bag before stamping, painting or cutting. It stops ink from soaking through to the back and gives a craft knife something to cut against. Fold the top down once, about 1.5 in (4 cm), and crease it before you start, so you know where the closure will sit and can keep decoration below that line.
Three ways to close the bag
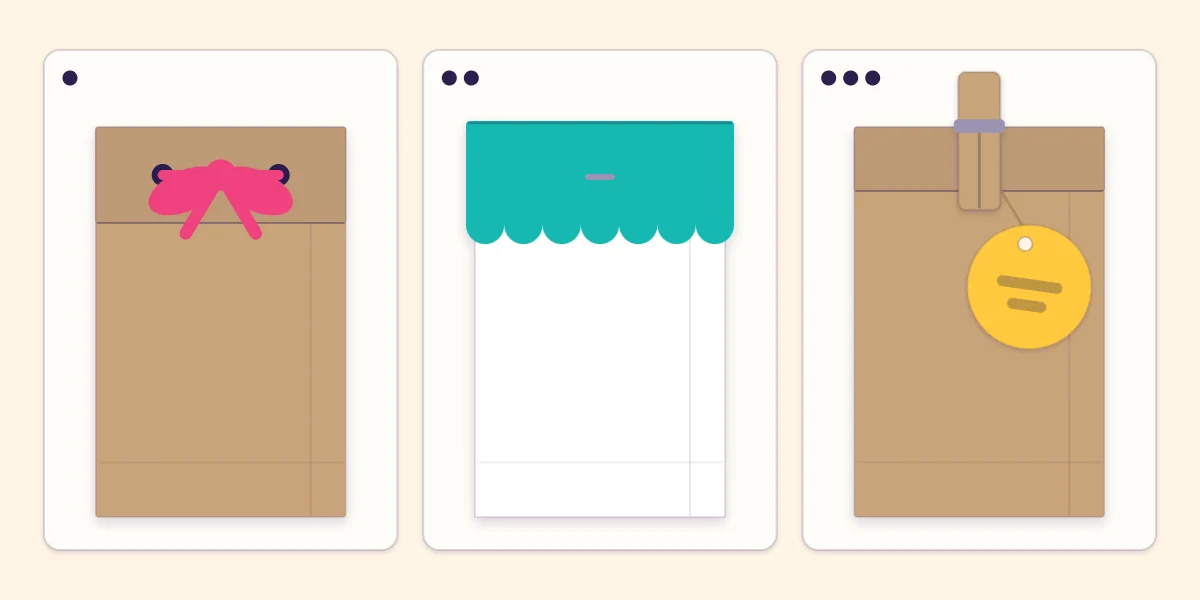
Ribbon through two holes
Fold the top over toward the back. Punch two holes through all the layers, about 1 in (2.5 cm) apart and centered. Thread about 12 in (30 cm) of ribbon in through one hole from the front and back out through the other, then tie a bow or a knot on the front.
A scalloped paper topper
Cut a cardstock rectangle as wide as the bag and about 4 in (10 cm) tall. Trace a coin along both long edges to draw a row of half circles and cut along them. Score across the middle, fold the topper over the top of the bag like a saddle and fix it with double-sided tape or two staples, which the scallops will hide if you staple just under them.
A clothespin and a tag
Fold the top down and clip it with a small clothespin, catching a round paper tag under the jaw. This is the fastest closure and the only one that can be opened and reclosed without damage, which helps if you need to add something at the last minute.
Four ways to decorate the front
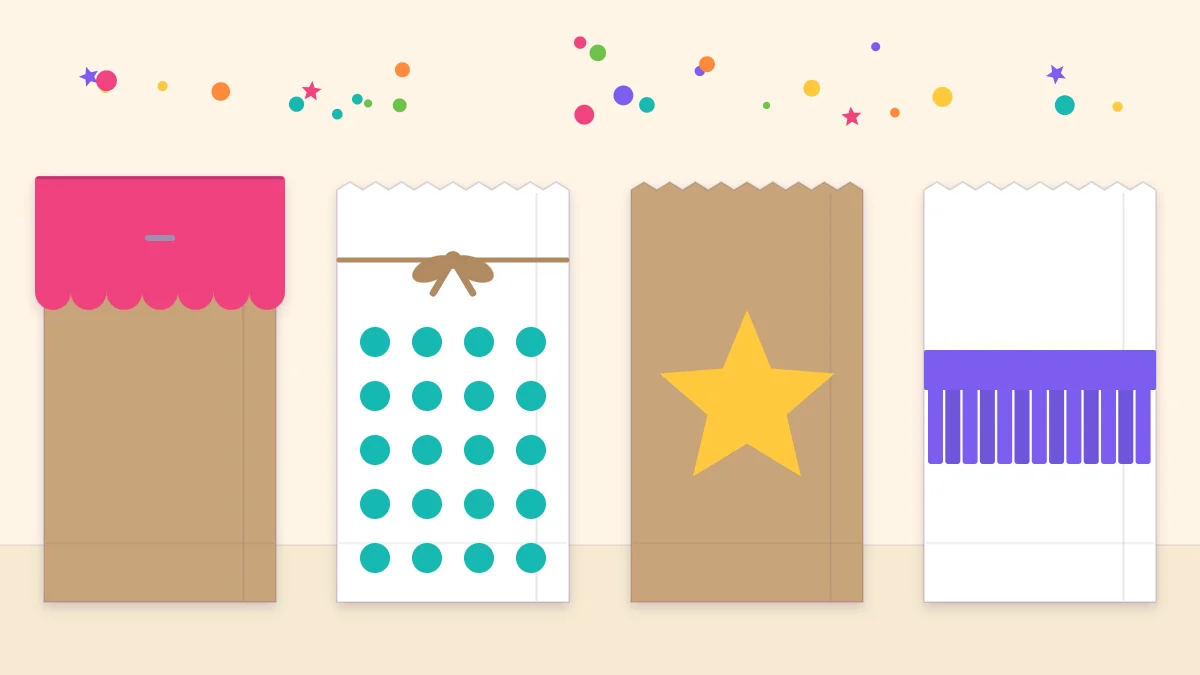
A cut-paper shape or initial
One large shape reads better than several small ones. Cut a star, heart or circle about 3 in (7.5 cm) across, or a block-style initial drawn by hand, and glue it to the center of the front with a glue stick taken right to the edges. Fold the paper in half before cutting symmetrical shapes so both sides match.
Eraser-stamped dots
Press the flat eraser of a new pencil onto an ink pad, or dip it lightly into a thin puddle of paint, and stamp. Re-ink every one or two dots for even color. Work in loose diagonal rows, or cluster the dots thickly at the bottom and thin them out toward the top. Let the bags dry flat in a single layer before stacking them.
A doily or fringe band
Glue half a paper doily so its curved edge hangs over the fold, or make a fringe band: cut a strip of tissue or streamer about 2 in (5 cm) tall, snip slits about 1/2 in (12 mm) apart two-thirds of the way up, and tape the uncut edge across the bag. Two overlapping rows in different colors look fuller than one.
A window
Draw a circle or square about 2 in (5 cm) across on the front, cut it out with a craft knife over the scrap card inside the bag, and tape a piece of clear sheet behind the opening from the inside. A window works best on flat bags, and a layer of colored tissue or handmade paper confetti behind it gives the opening something bright to show.
Safety note
Cutting windows with a craft knife is an adult job. Children helping with the bags can stamp dots and glue shapes, with supervision around scissors.
The six treatments compared
| Treatment | Effort per bag | Drying time | Best on |
|---|---|---|---|
| Ribbon-tied fold | Very low | None | Any bag |
| Scalloped topper | Low | None | Lunch bags |
| Cut-paper shape or initial | Low | A few minutes | Any bag |
| Eraser-stamped dots | Low | About 15 minutes or more with paint | Kraft bags with white or bright ink |
| Doily or fringe band | Medium | None | White bags |
| Window | Higher | None | Flat bags |
Keeping a set consistent
Limit the set to two colors plus the bag’s own kraft or white, and to one front treatment and one closure. If you want variety, alternate the two colors from bag to bag and keep everything else identical. Using colors already in the banner or table pieces ties the favors to the room without extra planning.
Names belong on a tag rather than on the bag itself, so a spelling mistake costs a scrap of paper instead of a finished bag. The tutorial on handmade favor tags shows four shapes that can be tied on with the ribbon or caught under the clothespin.
A batch workflow for 10 to 20 bags
- Make one complete sample bag first and check that you like it.
- Fold and crease the tops of all the bags.
- Cut every shape, topper or fringe strip for the whole set.
- Decorate all the fronts, one step at a time, and let anything wet dry.
- Punch all the holes, if you are using ribbon.
- Fill the bags, then close them and add the tags.
Tip
Make two extra bags. One covers a stamping slip or a torn hole, and the other is ready for an unexpected guest.
Whatever goes inside should suit the ages of the guests, and small items need care around young children. For small, flat favors that would rattle around in a bag, cardstock pillow boxes are a closer fit and can be decorated in the same two colors.
Frequently asked questions
Should I decorate favor bags before or after filling them?
Before. A flat, empty bag gives a smooth surface for stamping, gluing and punching, while a filled bag bulges and makes all three harder. Decorate the fronts, let anything wet dry, then fill and close the bags last.
How do I keep ink or paint from soaking through a paper bag?
Slide a piece of scrap cardstock inside the flat bag before stamping or painting. Use a thin layer of paint or a lightly inked eraser, and let the bags dry in a single layer rather than in a stack.
What is the easiest way to close a paper favor bag?
Fold the top down once and clip it with a small clothespin, or punch two holes through the fold and tie a ribbon through them. Both take under a minute per bag, and the clothespin can be opened again without tearing the paper.